Why bother snatching a Mac mini for Clawdbot? I'll teach you how to build the strongest local Agent and save $200 | Includes a nanny-level tutorial
2/13/2026
19 min read
This year, local Agent products are really hot. It's no exaggeration to say that a blockbuster appears every week.
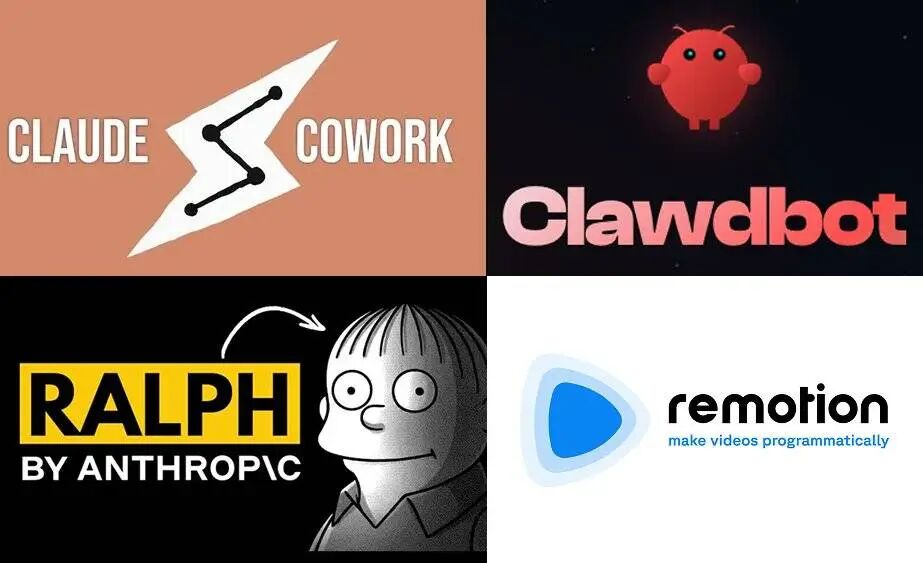
First, Claude Cowork generated nearly 50 million views as soon as it was released; then there was Clawdbot (now renamed Moltbot), whose number of Stars on GitHub skyrocketed from 2,000 to 70,000.
What did you miss this week?
There are so many tools that you simply can't try them all. Moreover, AI like Clawdbot, which requires you to deploy your own server, really discourages computer novices who want to try it. Cowork is even more outrageous, currently only open to Max subscribers at $200/month.
But whether it's Cowork or Clawdbot, there's actually a smarter choice; **what they both do is essentially evolved from Claude Code.** This tool, which has been around for almost a year, has suddenly become popular again this year.
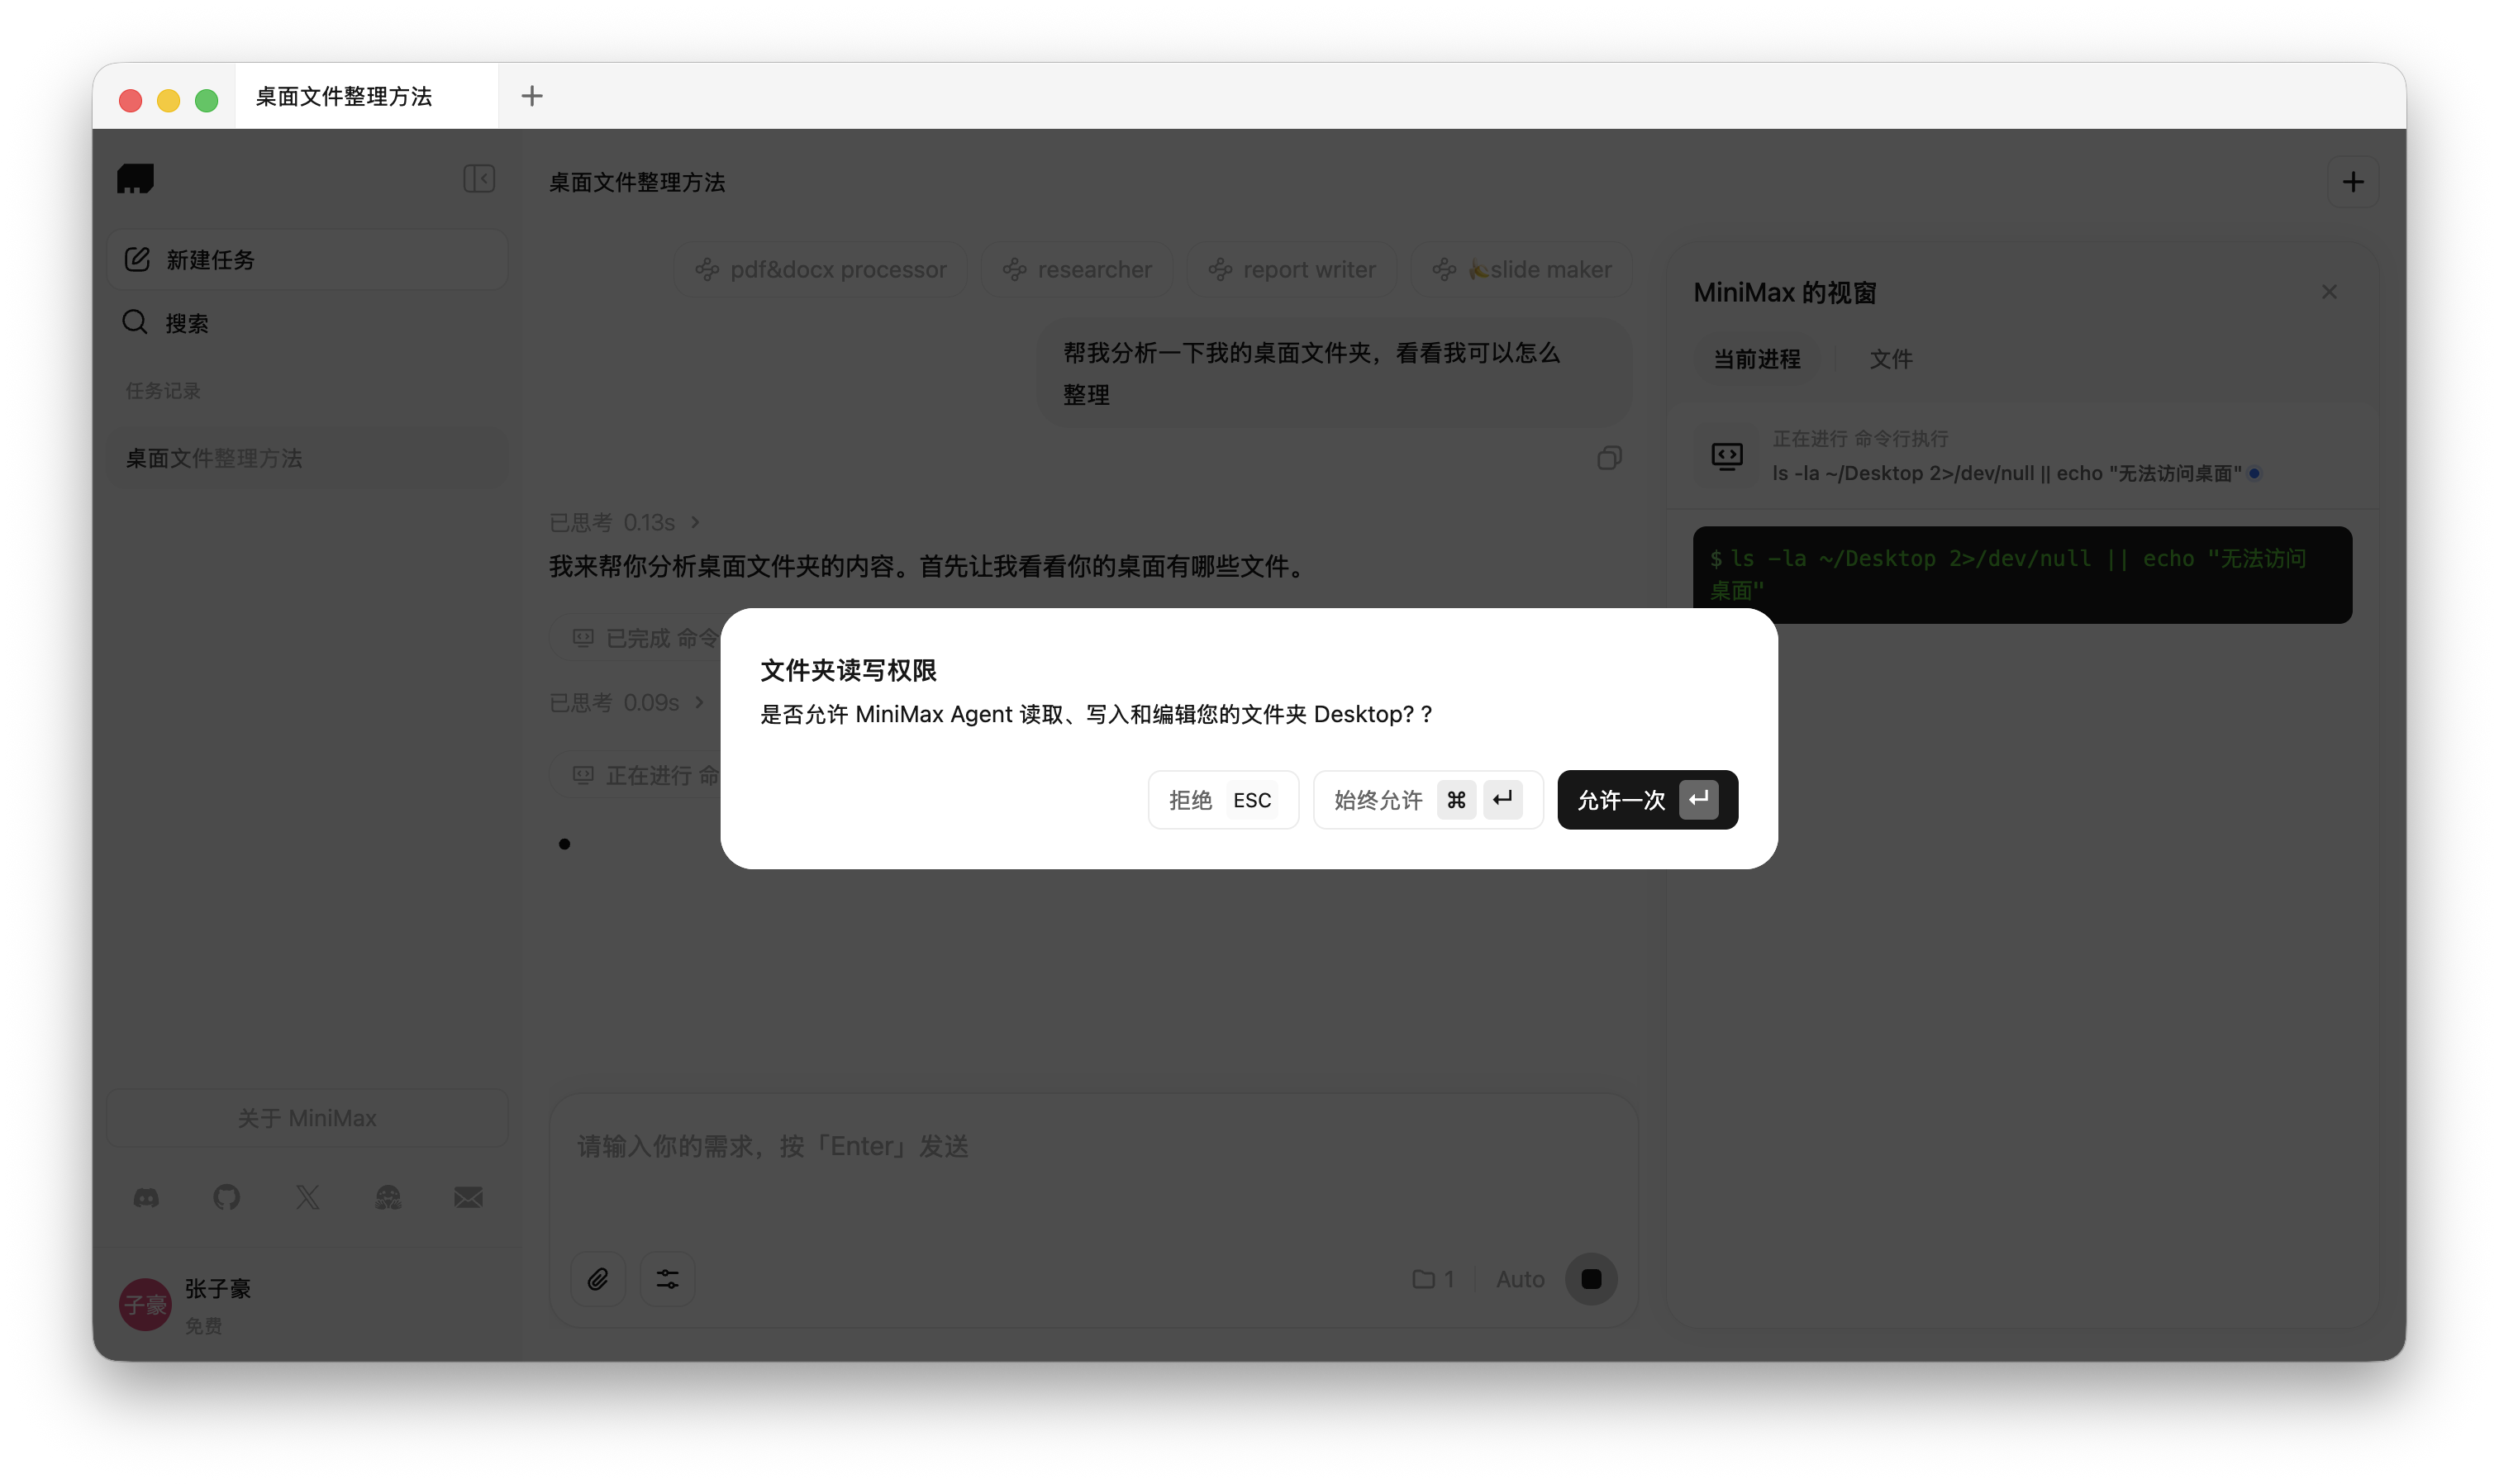
Chinese model manufacturers, such as MiniMax and Step, have also launched Agent 2.0 desktop apps and AI desktop partners, focusing on the "**Chinese version of Cowork**". Without exception, these applications are all advanced from the concept of Claude Code to create a local version of Agent.
Without buying a server or building locally, Claude Code is an officially provided "lightweight Cowork" that can be installed with one command. The Skills system is maintained by Anthropic officials, and the existing skill library is also richer.
**In this article, APPSO will teach you step by step how to build your own local Agent using Claude Code + Skills + Chinese models.**
**What are Skills**
In 2026, if you want to pretend to be cool in the AI circle, you can't just talk about Skills. If you're still stuck on prompts, you're already OUT. The concept of Skills has contributed greatly to the popularity of these tools.
Anthropic launched this feature in October last year, but it wasn't until the beginning of this year that various Skills tutorials really spread like a virus. I have to say that Anthropic has some technical skills. It's not the kind of pure marketing hype. The MCP protocol, which was widely adopted before, was also proposed by Anthropic.
Partial Skills aggregation website, sorting out the trend of Skill submissions, which has increased sharply this year|Source: https://skillsmp.com/
Unlike MCP, which is a USB protocol that connects to different data sources; Skills is more like an application market. Like the Chinese translation of "skills", it can organize applications with different needs into a separate skill. We can simply understand Agent as a game character. It has its own dedicated game positioning, and it also has many skill points, which are Skills.
In the past, we had no way to summarize a set of E to use combat skills, R to use ultimate moves for this character. We had to communicate with Agent over and over again about what to do; now these skills are packaged into a shortcut key. The next time you encounter the same monster, Skills will directly operate according to the previously designed process.
According to Anthropic's official introduction, they define Skills as a file directory that can turn a general-purpose Agent into a dedicated Agent.
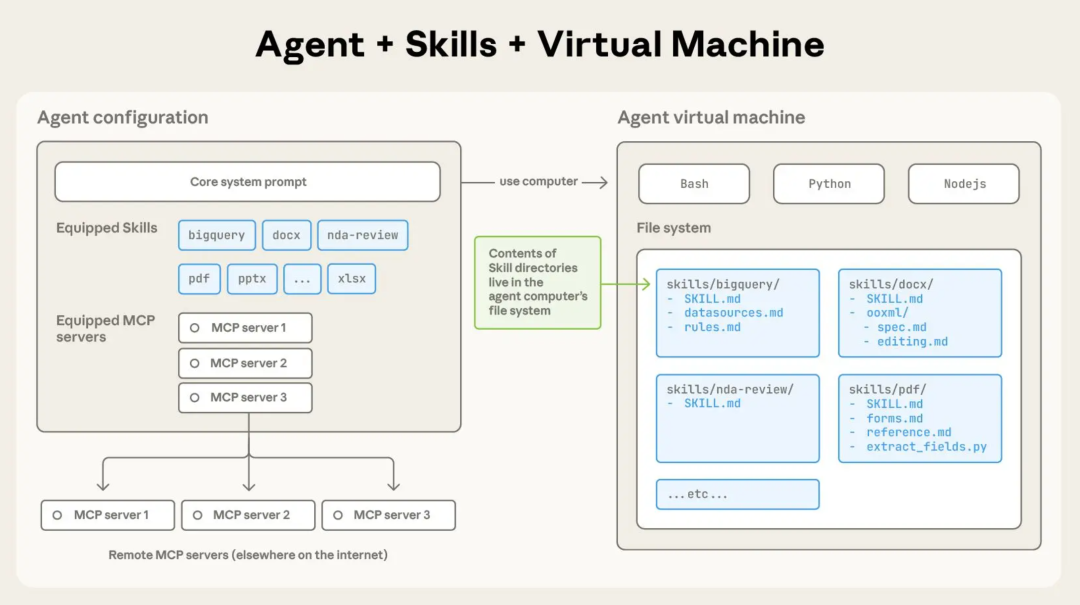Skills is a directory containing a SKILL.md file that organizes folders of instructions, scripts, and resources to provide additional functionality to the Agent.Since it's just a file directory, Skills also has the characteristic of being portable, and can be used directly in the Claude web page and application (member users only), as well as Claude Code, Cowork, API, third-party platforms, etc.
Still a bit confused? Let's look at a few popular ways to use Skills to get a more intuitive feel for its capabilities.
This official demo video introduces how to combine the **PowerPoint skill** with the **custom brand guide skill** in Claude, that is, dragging and dropping the compressed package into the Skills interface in the video, and then using the poster design skill to create concept maps.
Claude will automatically load these folders (Skill) containing instructions, scripts, and resources according to our needs; these Skills will be like a customized onboarding material, allowing AI to get started as soon as it arrives, and more efficiently achieve our needs.
Another very popular one recently is letting Claude generate videos. By using the  There will also be a description in the skill.md document to tell the Agent when to invoke the Skill.
This 2.35:1 cover has an online design sense, but it's a bit too minimalist.
There will also be a description in the skill.md document to tell the Agent when to invoke the Skill.
This 2.35:1 cover has an online design sense, but it's a bit too minimalist.
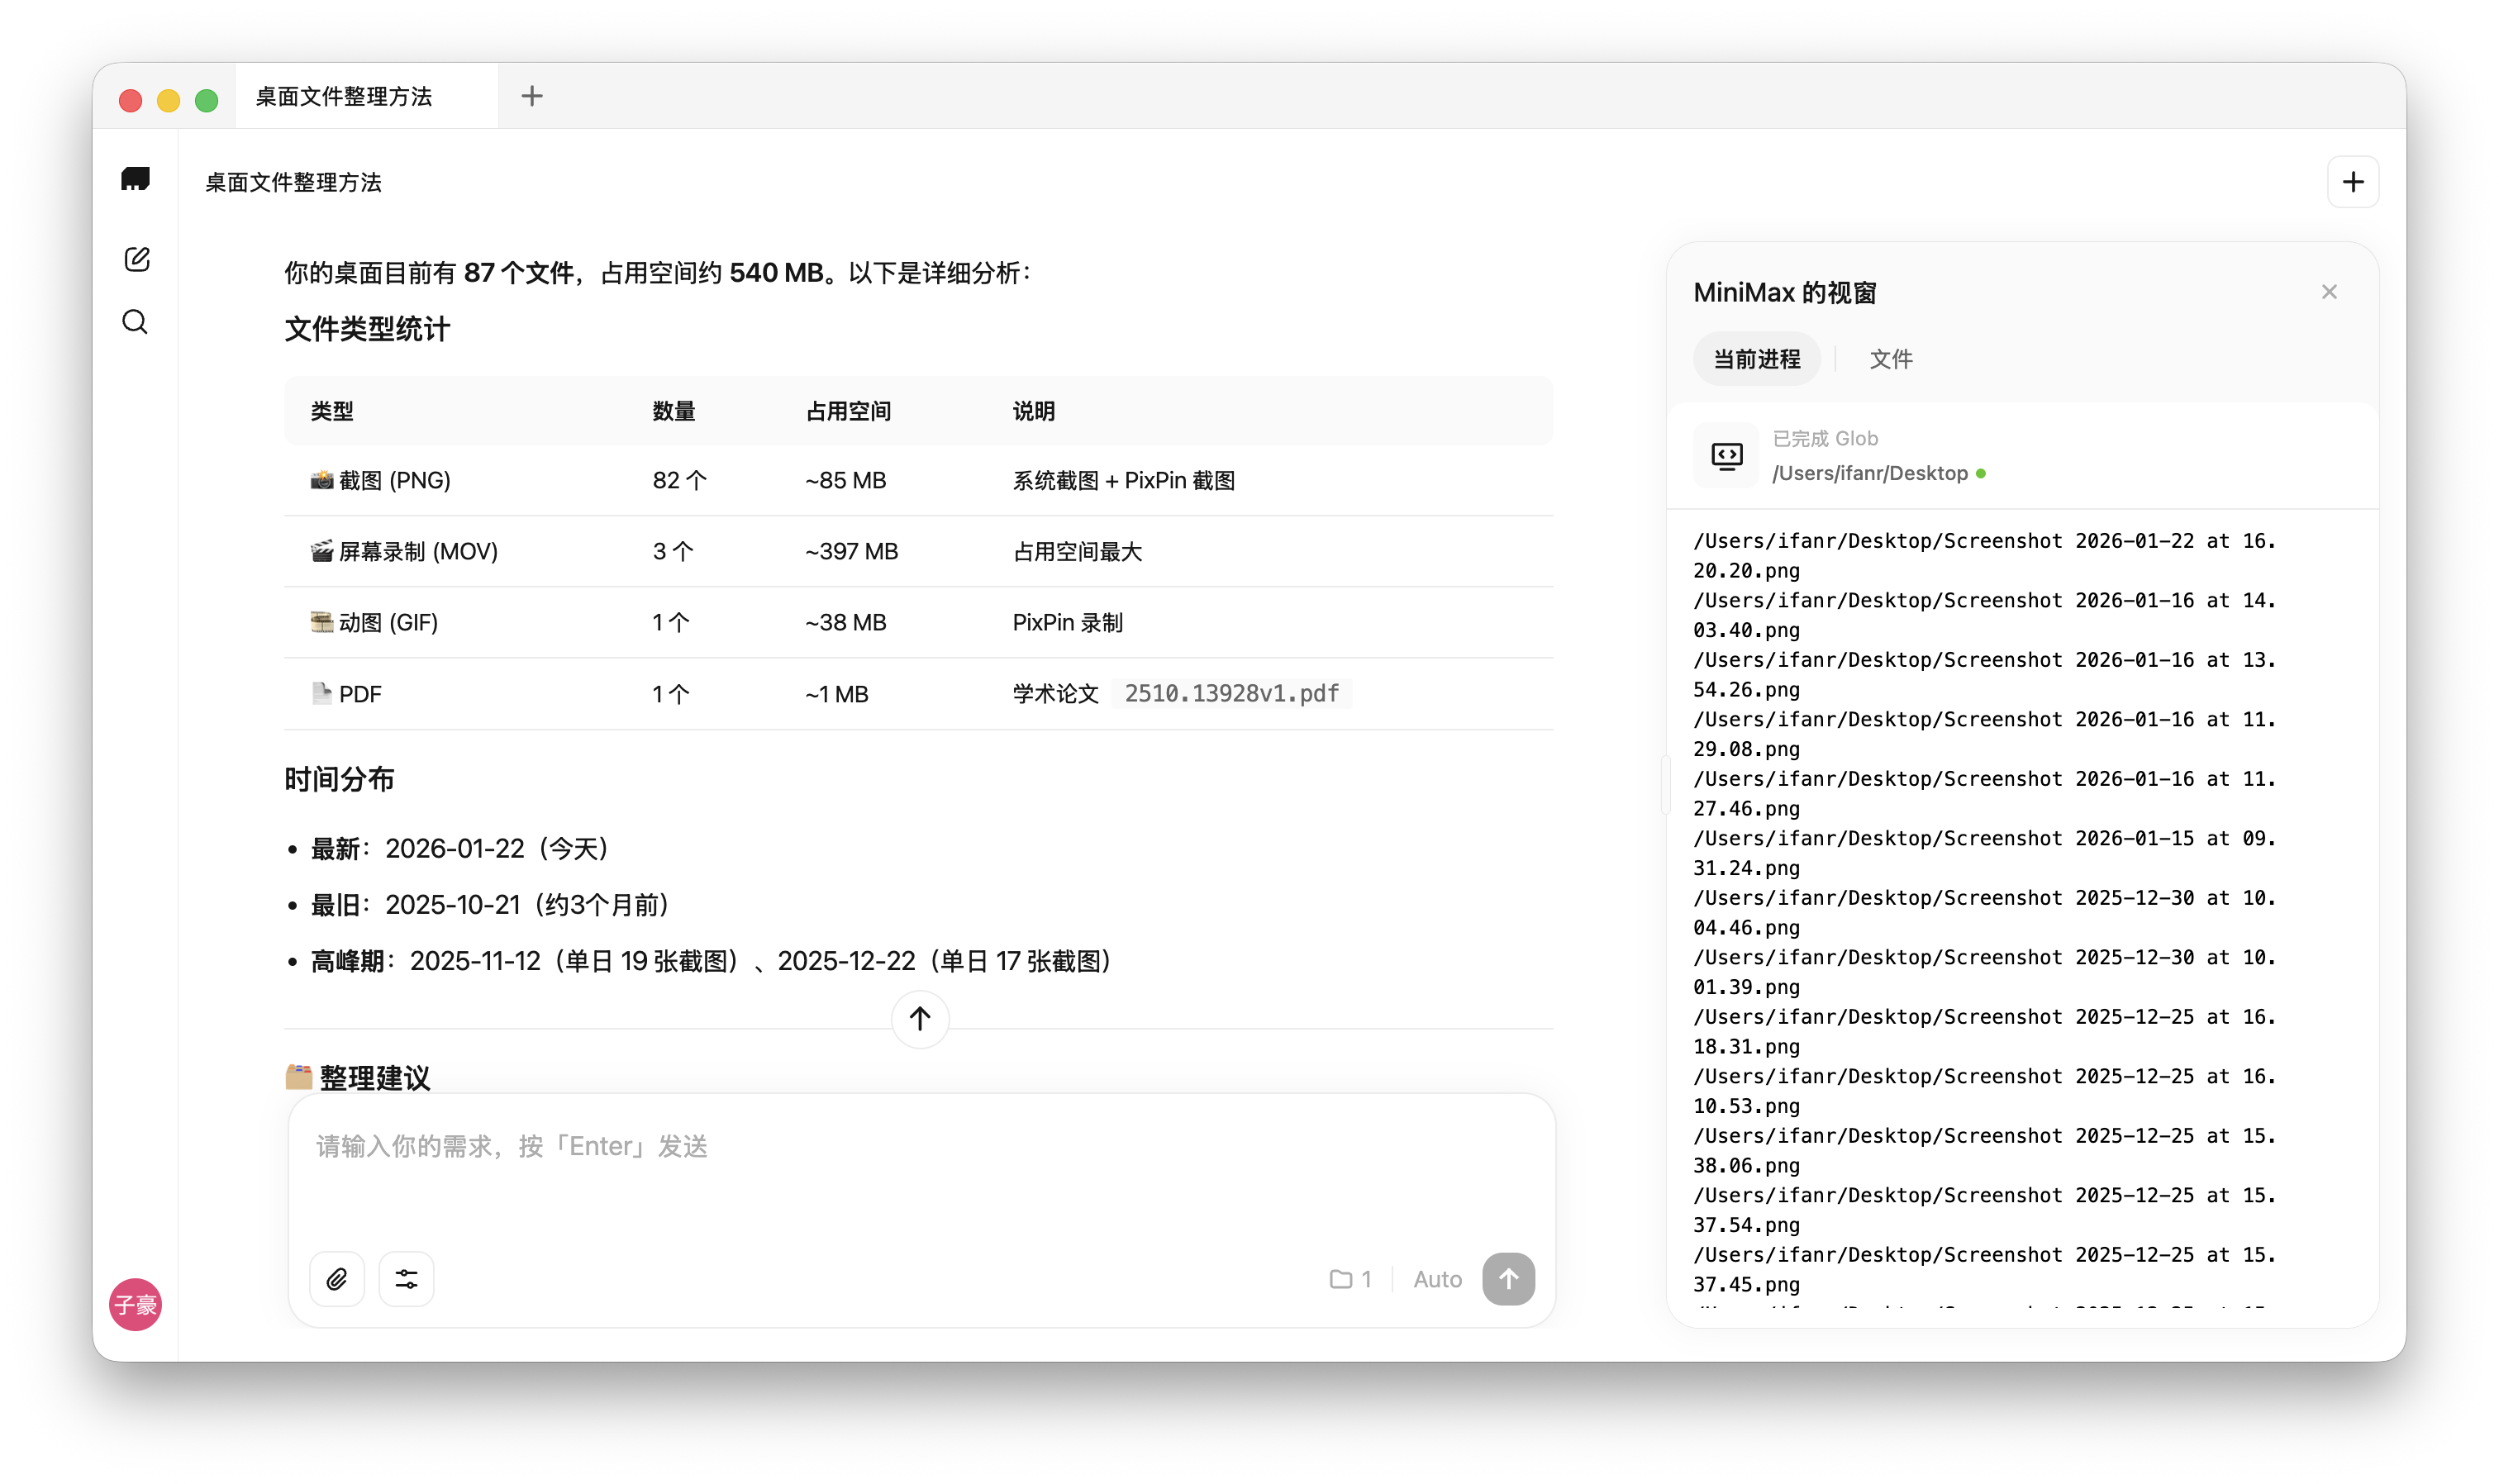
 Directly processing computer files has advantages and obvious disadvantages. Sometimes, deleting useful files without warning is the most common complaint on social media about products like Claude Code.
After enabling Plan mode, a prompt will appear saying "plan mode on"
A small tip is that when using Claude Code, **you can press shift+tab to switch to Plan Mode.**
In Plan Mode, Claude Code will not only remain in "read-only mode", without performing any operations on computer files, but will only provide an execution plan first; in addition, it will have more thinking than normal mode.
Although Claude officially recommends that we use Plan Mode for multi-step implementation, code exploration, and interactive development projects, our experience is that there is no additional impact when it is turned on for general tasks.
Like this shortcoming, Claude Code is not a product for general users, even Skills are not.
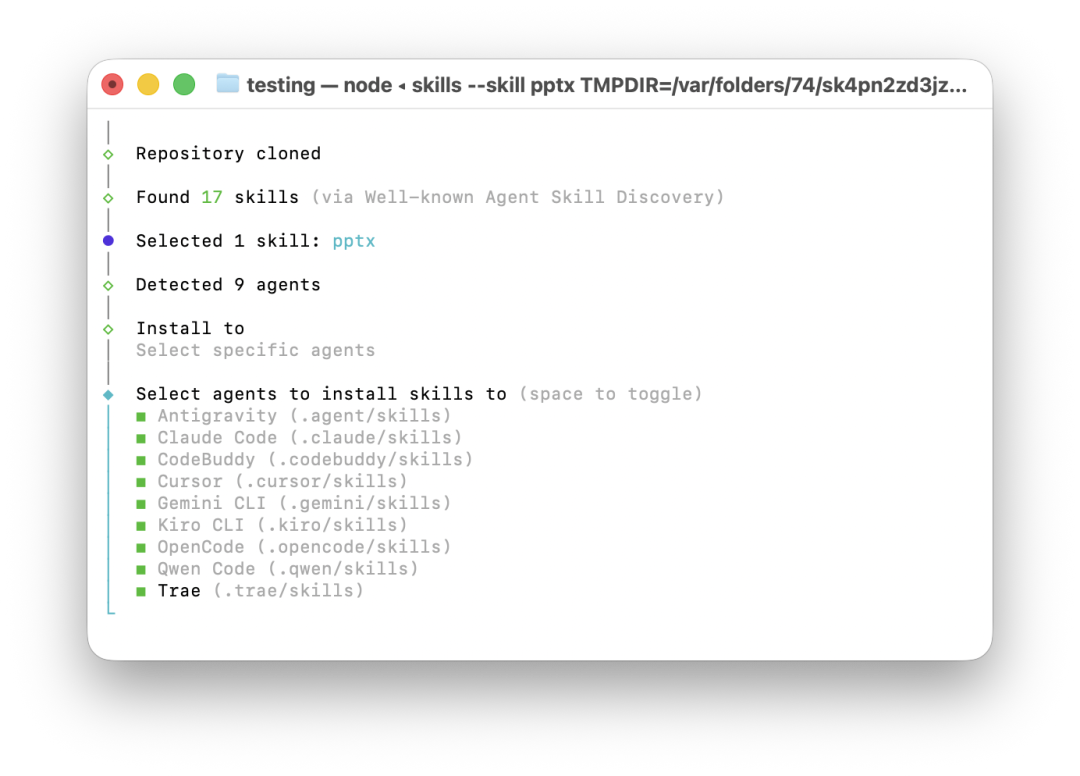
When we install Skills, if you already have these programming tools installed on your computer, you will see that it can select different Agents, **including OpenCode, Cursor, ByteDance's Trae, Tencent's CodeBuddy, Gemini CLI, and other tools**.
Directly processing computer files has advantages and obvious disadvantages. Sometimes, deleting useful files without warning is the most common complaint on social media about products like Claude Code.
After enabling Plan mode, a prompt will appear saying "plan mode on"
A small tip is that when using Claude Code, **you can press shift+tab to switch to Plan Mode.**
In Plan Mode, Claude Code will not only remain in "read-only mode", without performing any operations on computer files, but will only provide an execution plan first; in addition, it will have more thinking than normal mode.
Although Claude officially recommends that we use Plan Mode for multi-step implementation, code exploration, and interactive development projects, our experience is that there is no additional impact when it is turned on for general tasks.
Like this shortcoming, Claude Code is not a product for general users, even Skills are not.
When we install Skills, if you already have these programming tools installed on your computer, you will see that it can select different Agents, **including OpenCode, Cursor, ByteDance's Trae, Tencent's CodeBuddy, Gemini CLI, and other tools**.
 These tools are designed for developers. The fact that they can now come out of the code circle may also confirm that in the AI era, the difference brought about by this type of tool will become smaller and smaller.
Everyone can pick up a handy tool, build wheels, assemble them into cars, and then drive this car to take us to places we have never been before.Future APPSO will bring more tool guides for the AI era. Our offline event, AIDONE, is also constantly being updated. Join us to discover and experience better and more useful products of tomorrow.
These tools are designed for developers. The fact that they can now come out of the code circle may also confirm that in the AI era, the difference brought about by this type of tool will become smaller and smaller.
Everyone can pick up a handy tool, build wheels, assemble them into cars, and then drive this car to take us to places we have never been before.Future APPSO will bring more tool guides for the AI era. Our offline event, AIDONE, is also constantly being updated. Join us to discover and experience better and more useful products of tomorrow.
remotion-best-practices skill in Claude Code, we can directly generate a video with one sentence.
In addition, in this official Anthropic Skills library, there are a large number of Skills for web design, front-end design, PDF cropping and pagination, file compression, image format conversion, image cropping and splicing, etc. As long as you can think of it, you can now complete it directly through Skills.
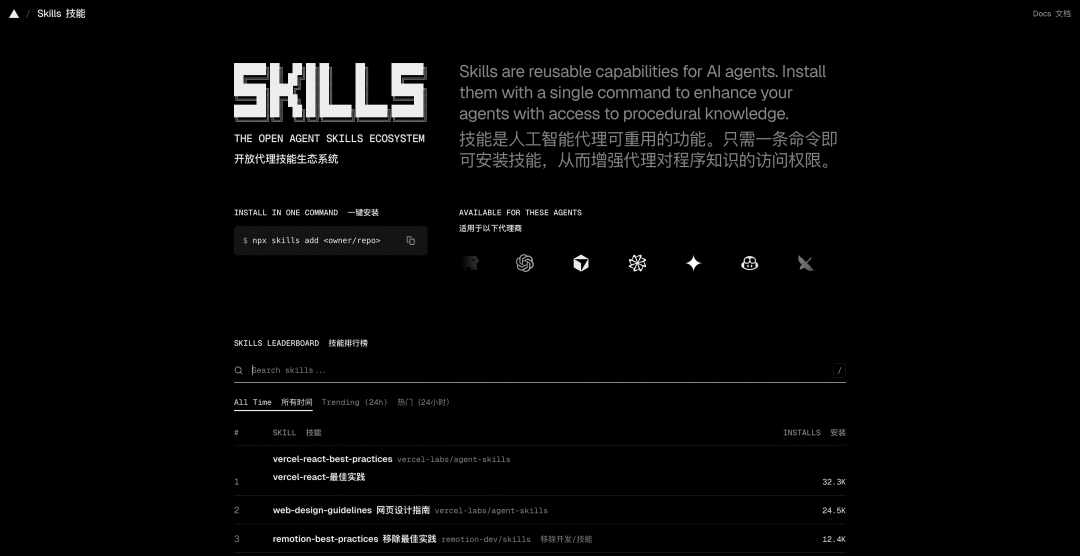 Official Skills Library https://skills.sh/
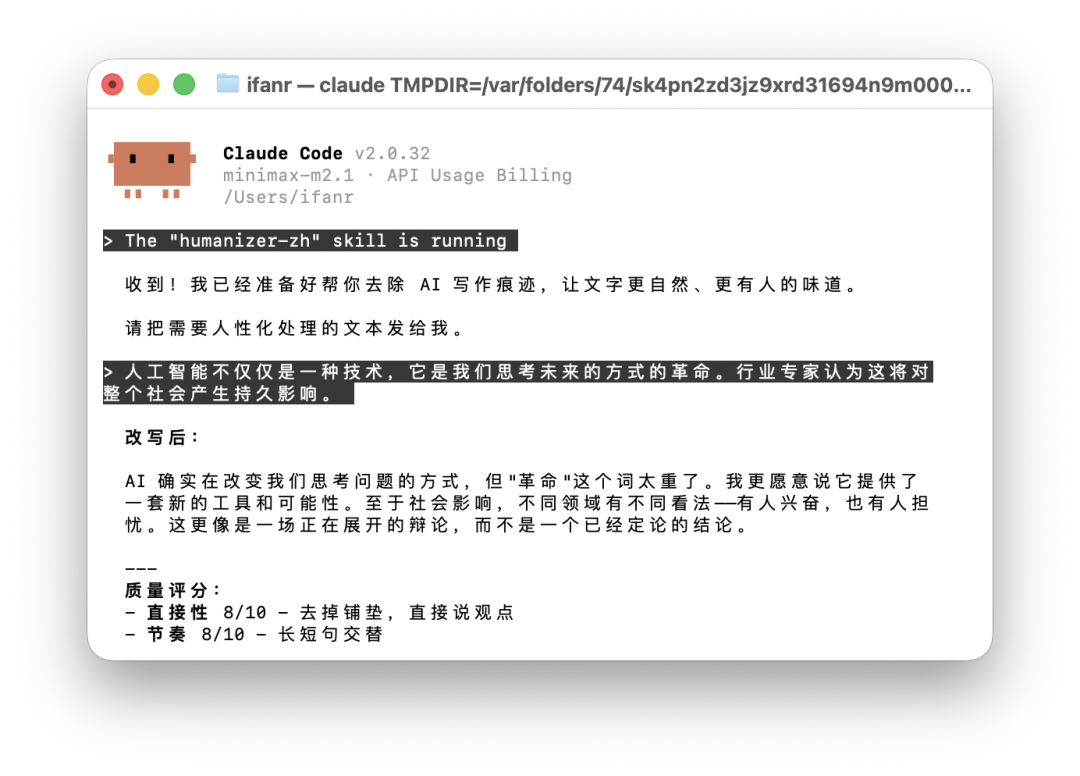
There is even a Skill for editors to remove the AI flavor, which has received a thousand likes on GitHub. We enter /humanizer-zh in Claude Code, run the Skill directly, and then enter the question that needs to be modified. This Skill will directly generate the rewritten text and the details of the changes.
 The question is, how do we use Skills that can directly do work for us?
**Install Claude Code on your computer**
Claude's subscribers can directly enable it in the Claude web page and App. For free users, the most popular way to use it is currently Claude Code, which is also the "scaffolding" version of Claude Cowork.
**Having Claude Code is equivalent to having Cowork, which requires a $200 subscription, and Skills, which requires a $20 subscription.**
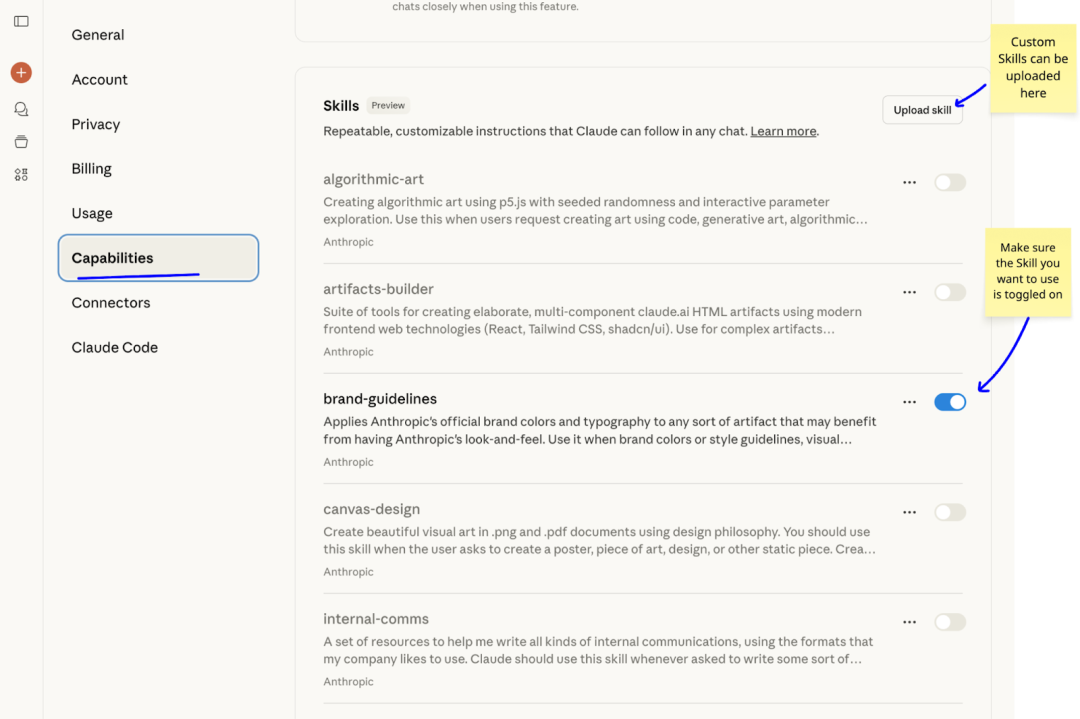
In the Claude settings interface, under the "Capability" option, subscribers can see the Skills function
APPSO will teach you how to configure Claude Code on your computer, and then use it as Cowork, allowing AI to operate your computer's local files, and also superimpose different Skills to complete more specialized tasks, and even use Skill to create your own Skills.
**Warm reminder: The estimated time is about one hour, depending on the network environment of different users. After 60 minutes, you will have an AI that can really solve 50% of human work. Also, don't be afraid of the dark terminal.**
To summarize, the general steps are:
**1.** Use a suitable network to download and install Node.js. Windows users need to additionally install the Git application.
**2.** Enter the installation command of Claude Code in the terminal. Windows users may need to additionally configure environment variables.
**3.** Purchase API. Zhipu, Kimi, MiniMax, Qianwen, and other major domestic AIs support connecting to Claude Code.
**4.** Modify the settings.json file of Claude Code, and replace the corresponding JSON file content according to the tutorial of different model API open platforms.**5.** Start using Claude Code, keep pressing Enter to wait for it to solve the problem, and directly copy the commands to install the corresponding Skills, letting Skills handle our requests.
**Step 1: Check the Network Environment**
Since it involves downloading different software installation packages, it is best to switch to a network that uses AI tools like ChatGPT and Gemini.
**Step 2: Understanding the Terminal**
Find the terminal on your computer. Don't be intimidated by its dark interface. Just treat it as a simple chat window. The only difference is that the language used in this black box is various obscure commands.
**Step 3: Software Download**
Download and install Node.js, download address: https://nodejs.org/en/download/.
**https://nodejs.org/en/download/**
After opening the webpage, the website will automatically identify the device information. We can scroll down directly. For macOS, download the PKG installation package, and for Windows, download the MSI installation package.


Nodejs webpage screenshot, use the default download, download the first one (.pkg file/.msi file)
Like normal software installation, we use all the default installation settings. Of course, if you already have Node.js installed on your computer, you can skip this step directly. The way to check if Node.js is installed is to enter the command "node --version" in the terminal, which is also the command to check if the installation is successful.
**node --version**
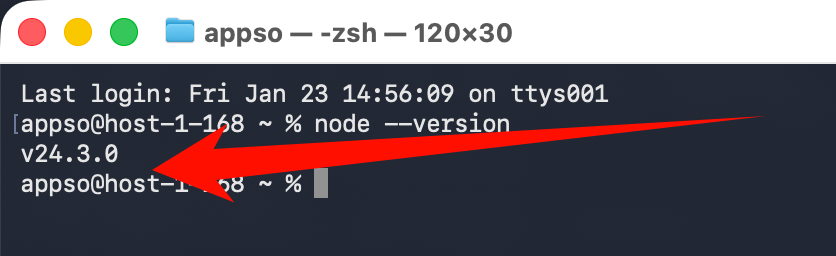
If the installation is successful, the terminal should display the version number "v24.13.0". The specific version may vary.
Next is an additional operation for Windows users. In addition to installing Node.js, **Windows users also need to install Git**, which we call a version control tool.
Like installing Node.js, first copy the URL to the browser to open it, https://git-scm.com/install/windows, and now there should be relatively few ARM64 Windows computers. We generally download the first "Git for Windows/x64 Setup".
**https://git-scm.com/install/windows**
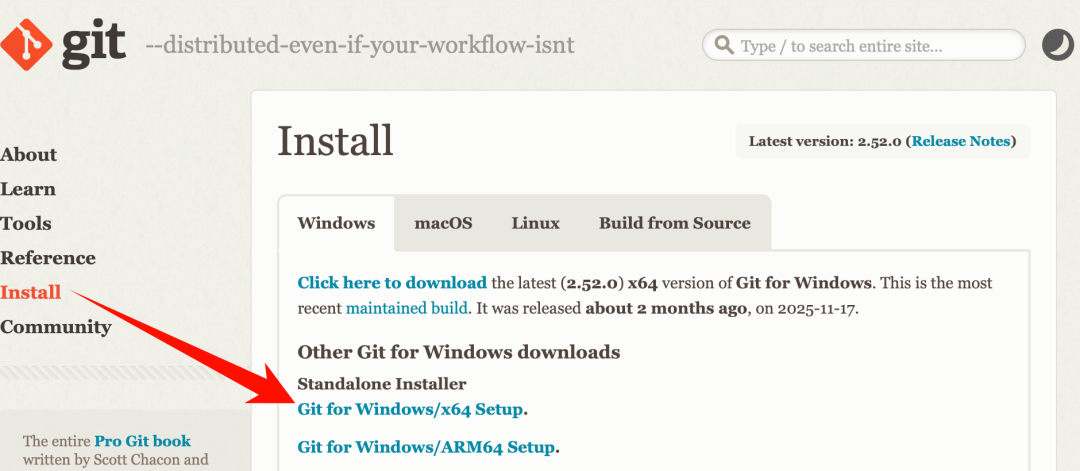
If you want to check the architecture of your Windows computer, you can also find it in Settings-System-System Information-Device Specifications, which generally says "64-bit operating system, x64-based processor".
The steps to install Git **also only require following the default installation settings. If you don't understand what it means, just click Next for each step.**
After the installation is complete, we will be prompted to "View Release Notes". Uncheck the box and then finish. Forgetting to uncheck the box will only open a webpage, so it's not a big problem.
**Step 4: Start Installing Claude Code**
If your computer operating system is macOS or Linux, you can directly copy the following command into the terminal. You can directly use the shortcut key CTRL+V to copy here, and then ENTER to run (send the command to the terminal).
**curl -fsSL https://claude.ai/install.sh | bash**
If you don't encounter network problems, we can directly see the installation completion prompt.
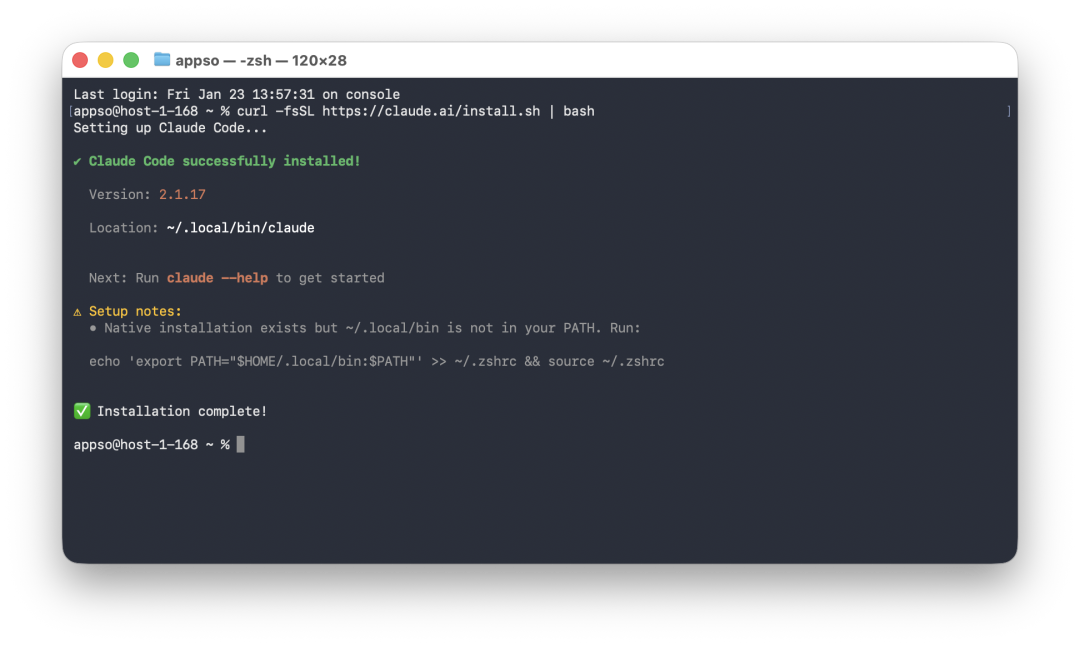macOS installation complete screenshot**For Windows users**, copy the following command to the terminal, i.e., open a window called Windows PowerShell, and then copy and run it. When copying, if CTRL+V fails and CTRL+V is entered as a command, you can use the right mouse button and select Paste.
**irm https://claude.ai/install.ps1 | iex**
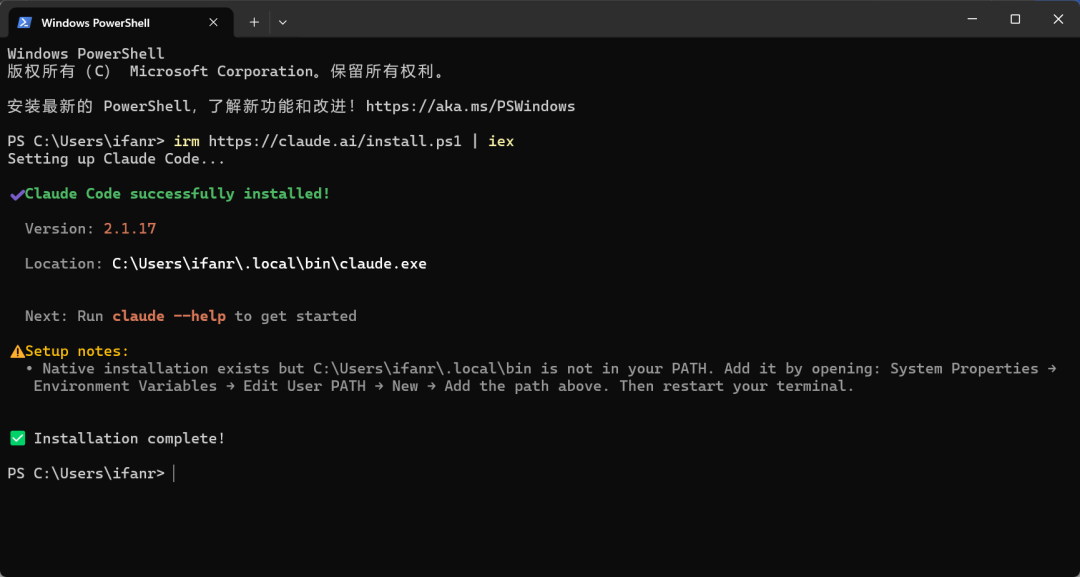Claude code installation complete page
If you are like me and **prompted with an environment variable issue** during the Windows installation process, add the corresponding environment variable according to the prompt information in the terminal.
**A Windows User Anecdote**
First, enter environment variables in the Windows search, and the result of editing system environment variables will be matched.
Click Environment Variables below
According to the information prompted by the terminal, USER PATH, we only need to modify the user variables above. First, select Path in the variable, and then click Edit.
Click New, **then copy the path information prompted in your terminal**, which is C:\Users\ifanr\.local\bin here.
**C:\Users\ifanr\.local\bin**
After editing, click OK, then click OK again to close the environment variable window. Then close the previous terminal, reopen a new one, and enter claude --version. If you see a version number appear, everything is done.
**claude --version**
**Step 5: Start Using Claude Code**
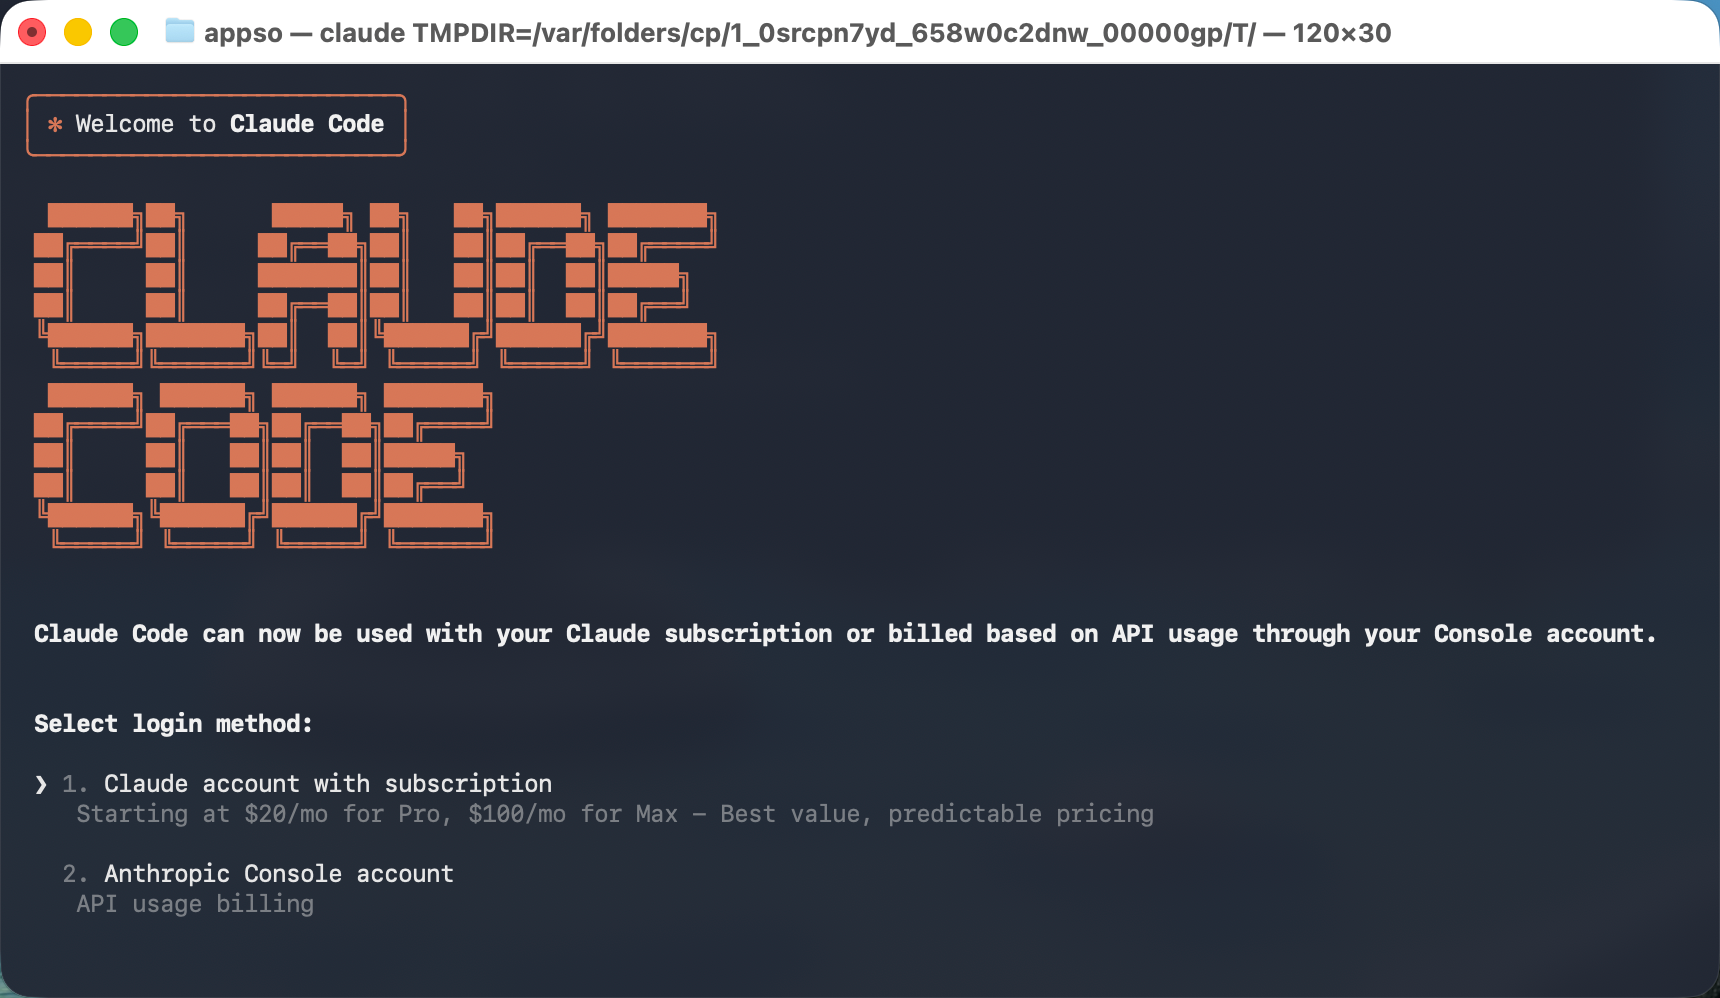
Enter claude in the terminal to officially enter the gate of Claude Code.
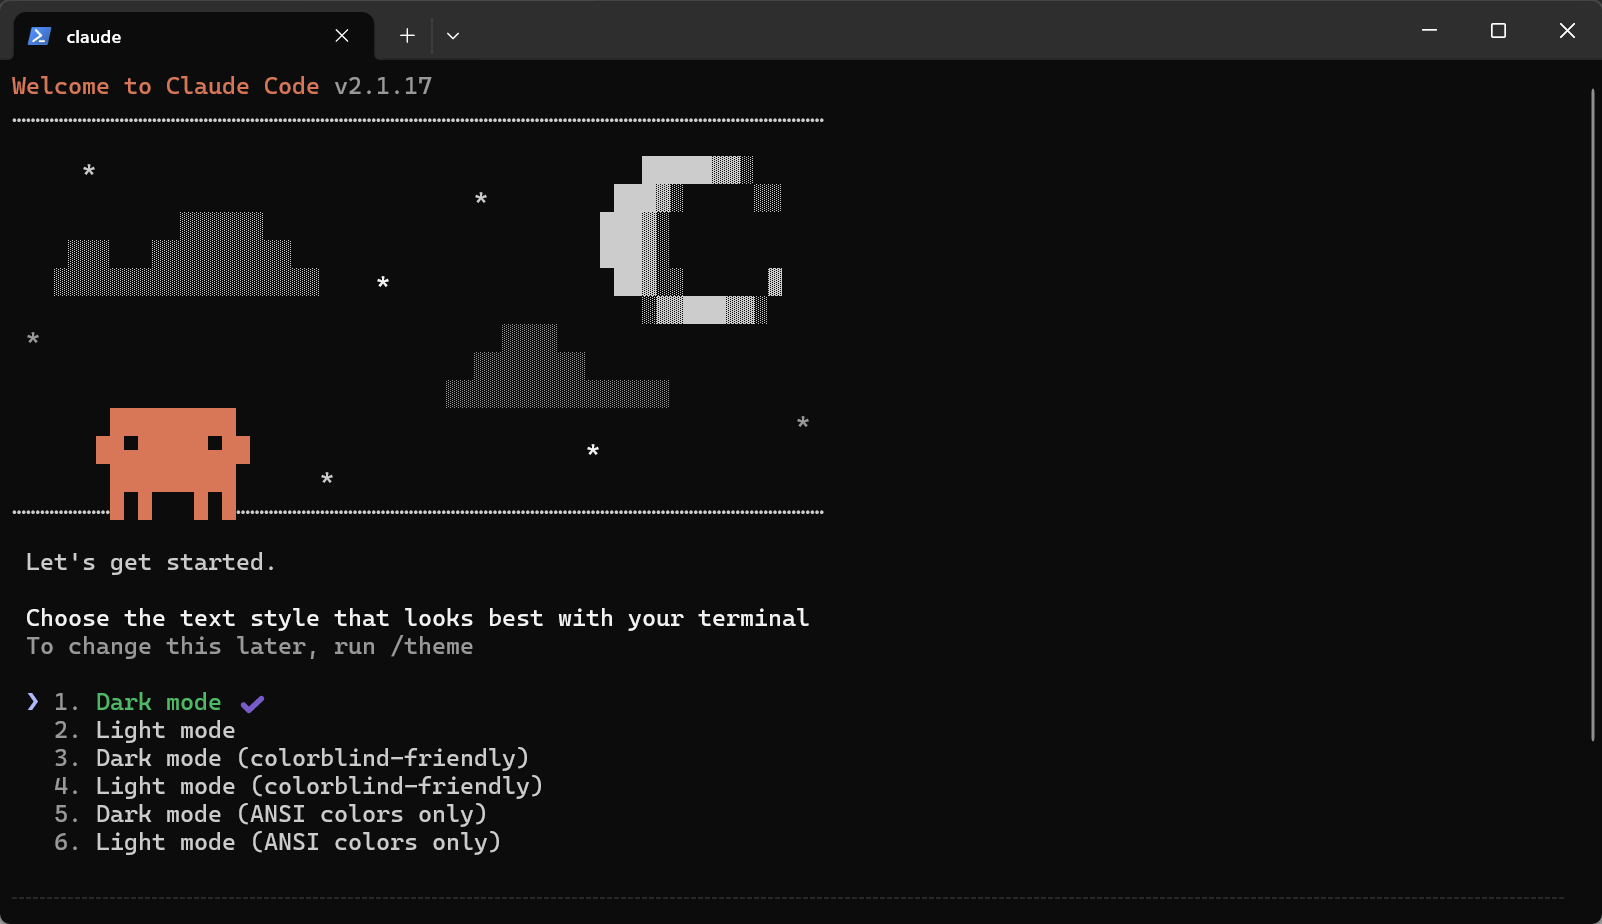
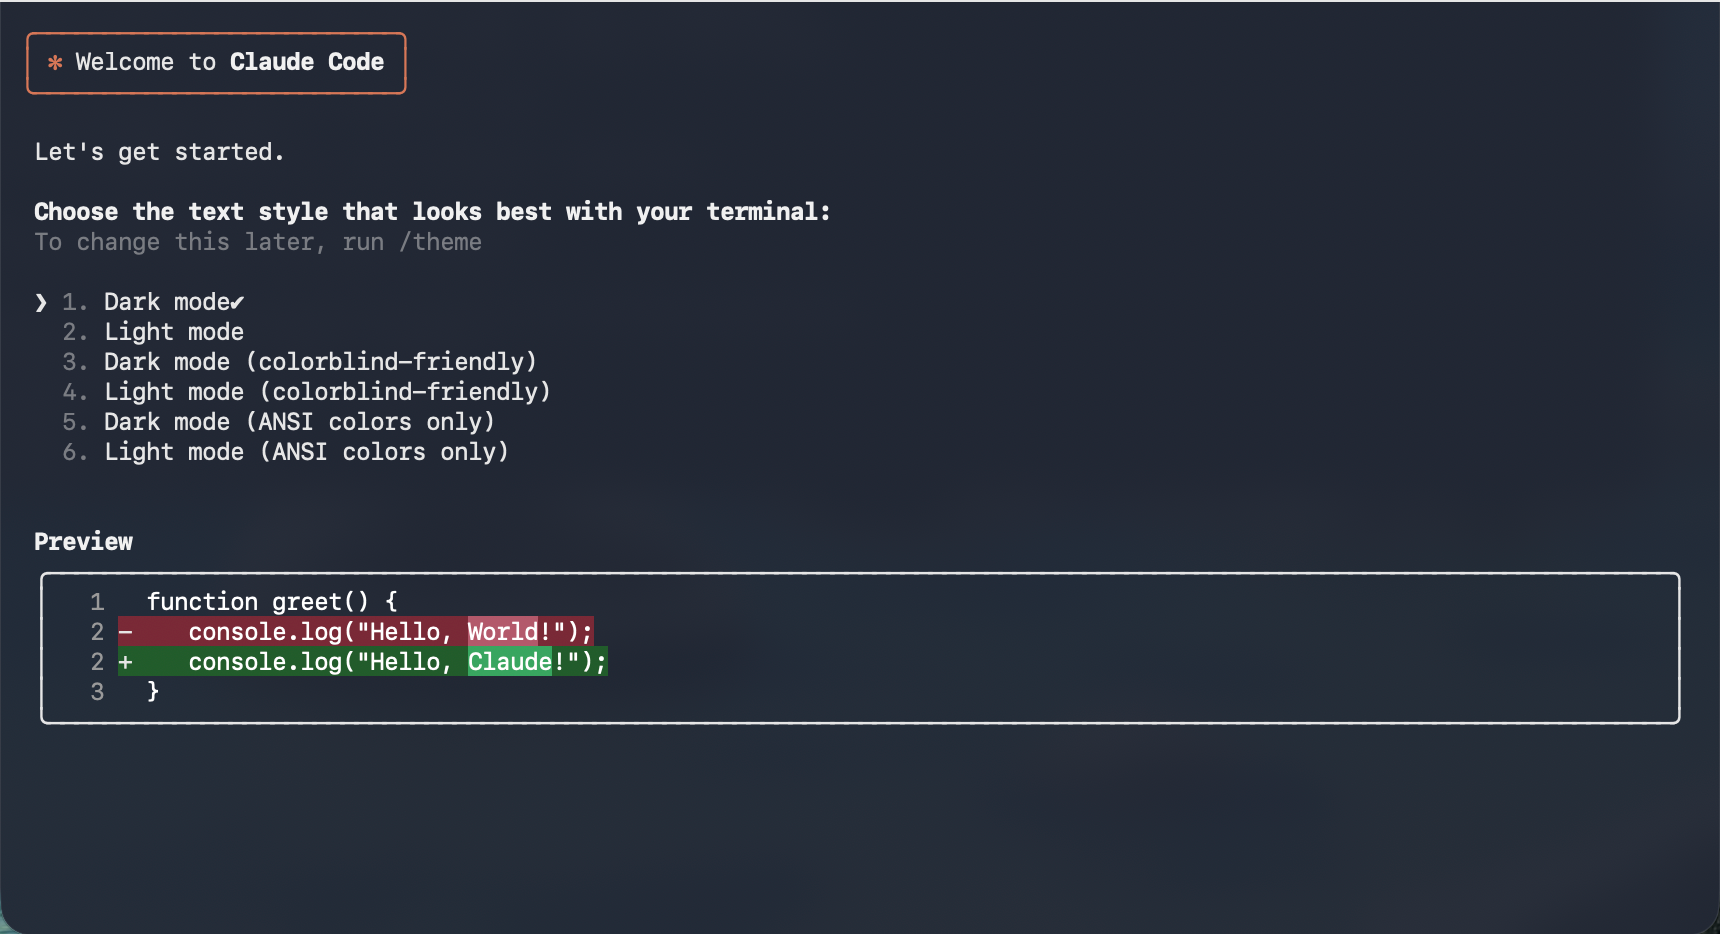The first time you open it, you will definitely have many discomforts. There are obviously many options to choose from, but I cannot click with the mouse.
Like the theme selection here, **we can only use the keyboard to select up and down, and then Enter/Space to indicate selection.** Generally speaking, the default first dark mode is sufficient.
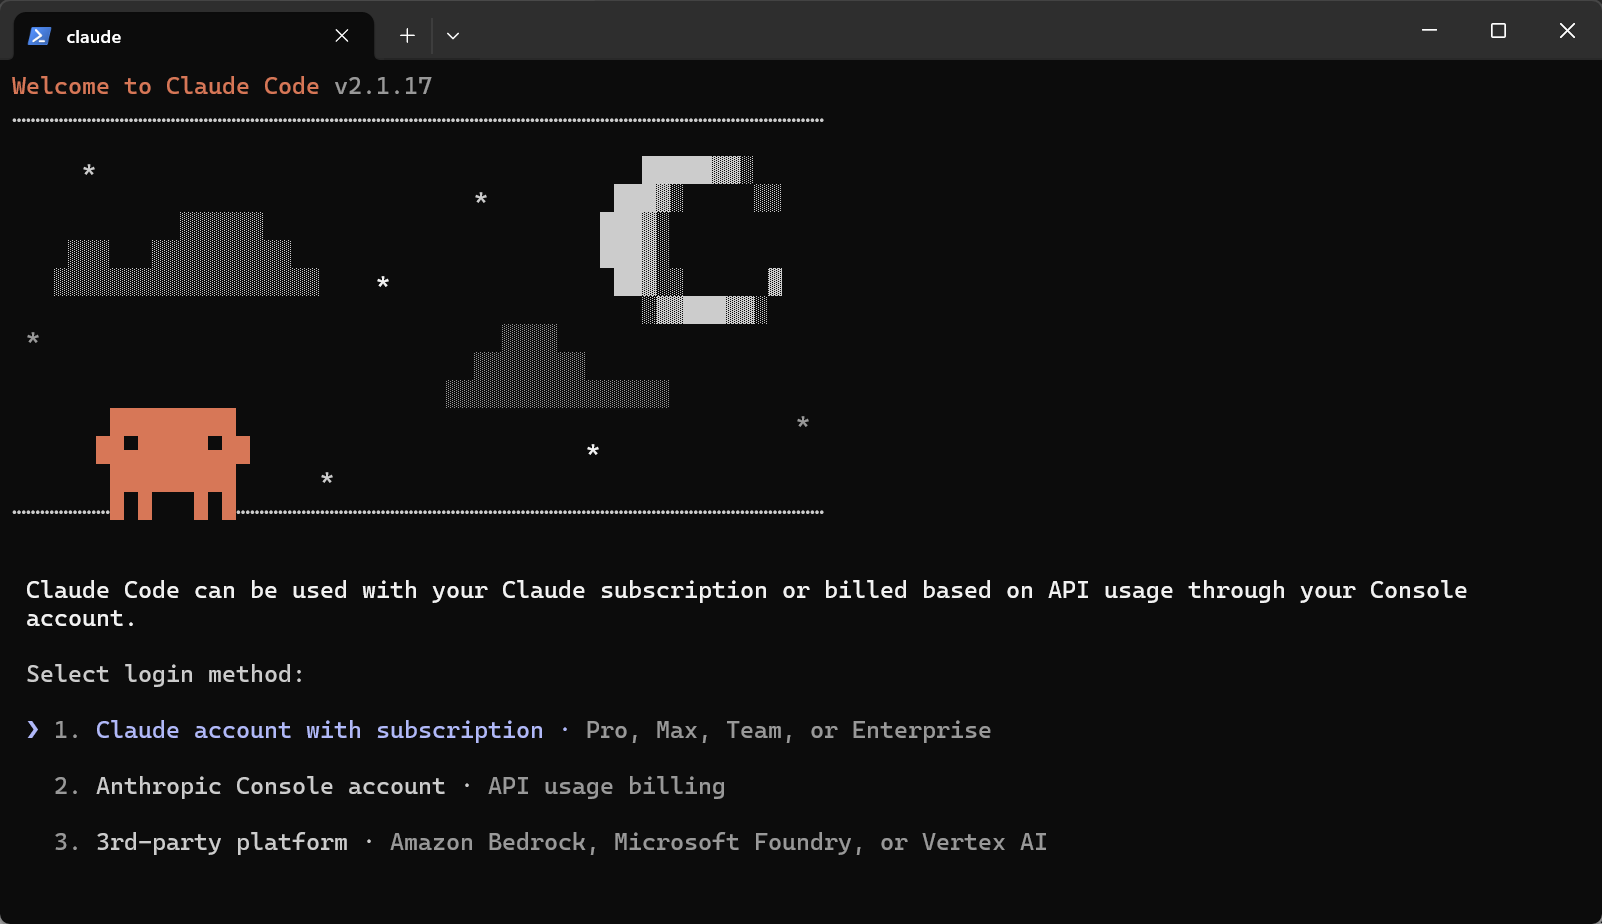
**Step 6: Set up API**
After selecting the theme, you will enter the API settings. Here, Claude account login, API, and third-party API options are provided, **but no matter which one you choose, it will require us to log in,** log in to Claude account, or Anthropic's API account.
**So at this time, we have to exit the terminal and set up the API first.**
Many Chinese large models support Claude Code. Whether it is a large model family like Qianwen, or the AI Six Little Tigers, MiniMax, Kimi, and Zhipu GLM, they all have dedicated documents for accessing Claude Code. The methods are basically the same, which is to modify the parameters.
Recently, there is even a special tool called cc-switch to directly modify the API information of Claude Code. Here we still demonstrate how to directly modify the file. The GitHub project address of the cc-switch tool is https://github.com/farion1231/cc-switch.
**https://github.com/farion1231/cc-switch**Taking ZhiPu as an example, we first need to obtain the API. The way to obtain APIs from different model vendors is different, but they can basically be found on the corresponding open platform. Generally, the API will only appear once, so copy it after creating it, and it is best to put it elsewhere first, but you can also recreate it.
**Windows Users**: Open the terminal and enter the command **notepad $HOME\.claude\settings.json**; then Notepad will pop up. In Notepad, add or replace the corresponding "env" information. You also need to replace the TOKEN with your real API-KEY.
**notepad $HOME\.claude\settings.json**
{ "env": {
"ANTHROPIC_AUTH_TOKEN": "your_zhipu_api_key",
"ANTHROPIC_BASE_URL": "https://open.bigmodel.cn/api/anthropic",
"API_TIMEOUT_MS": "3000000",
"CLAUDE_CODE_DISABLE_NONESSENTIAL_TRAFFIC": 1
} }
It is also very convenient to obtain the API. Go to their official website https://bigmodel.cn/usercenter/proj-mgmt/apikeys and create a new API KEY.
**https://bigmodel.cn/usercenter/proj-mgmt/apikeys**
ZhiPu also has activities now, and can directly send 2 million Tokens. It is recommended that novices can go directly to the ZhiPu official website and experience it for free.
**macOS users**, enter **open -e ~/.claude/settings.json** in the terminal, and the system's built-in text editor will be used to open the editing window.
**open -e ~/.claude/settings.json**
**If it prompts that the file does not exist, enter this command**,
**mkdir -p ~/.claude && echo "{}" > ~/.claude/settings.json && open -e ~/.claude/settings.json**
Then, similarly, **directly replace the content in settings.json**, and press CTRL+S to save the file.
Close the terminal, and then open it in the terminal in your working folder, enter claude, and we can directly enter and come to the dialogue page.
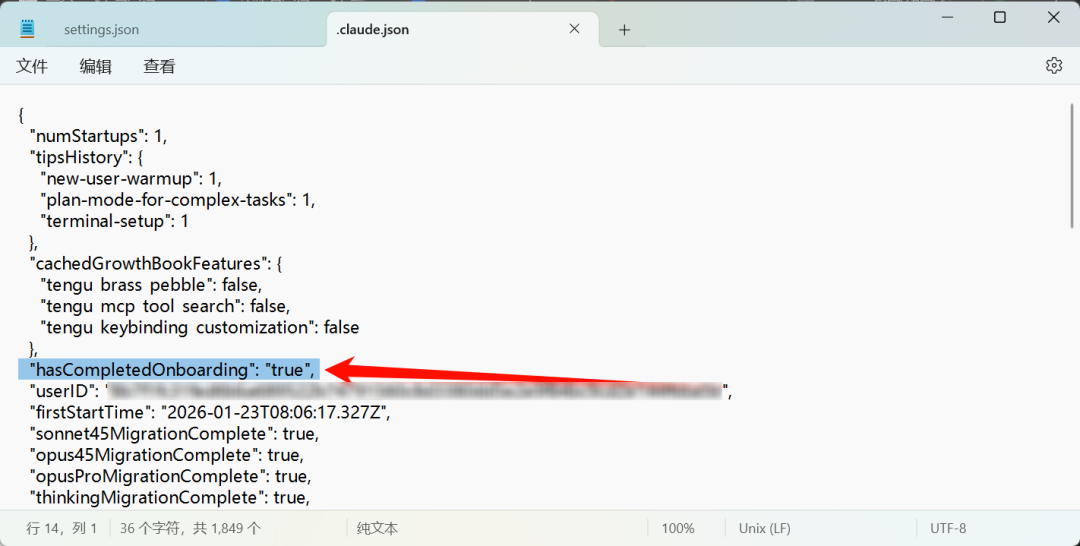
**Windows users may also encounter a small problem here**, that is, even though the settings.json file has been modified, re-entering claude still prompts me to log in to Claude account or Anthropic API account.
**Another small episode**
We need to enter notepad $HOME\.claude.json in the terminal, and then add or modify the following line in the opened Notepad file: "hasCompletedOnboarding": "true",
**notepad $HOME\.claude.json**
**"hasCompletedOnboarding": "true",**
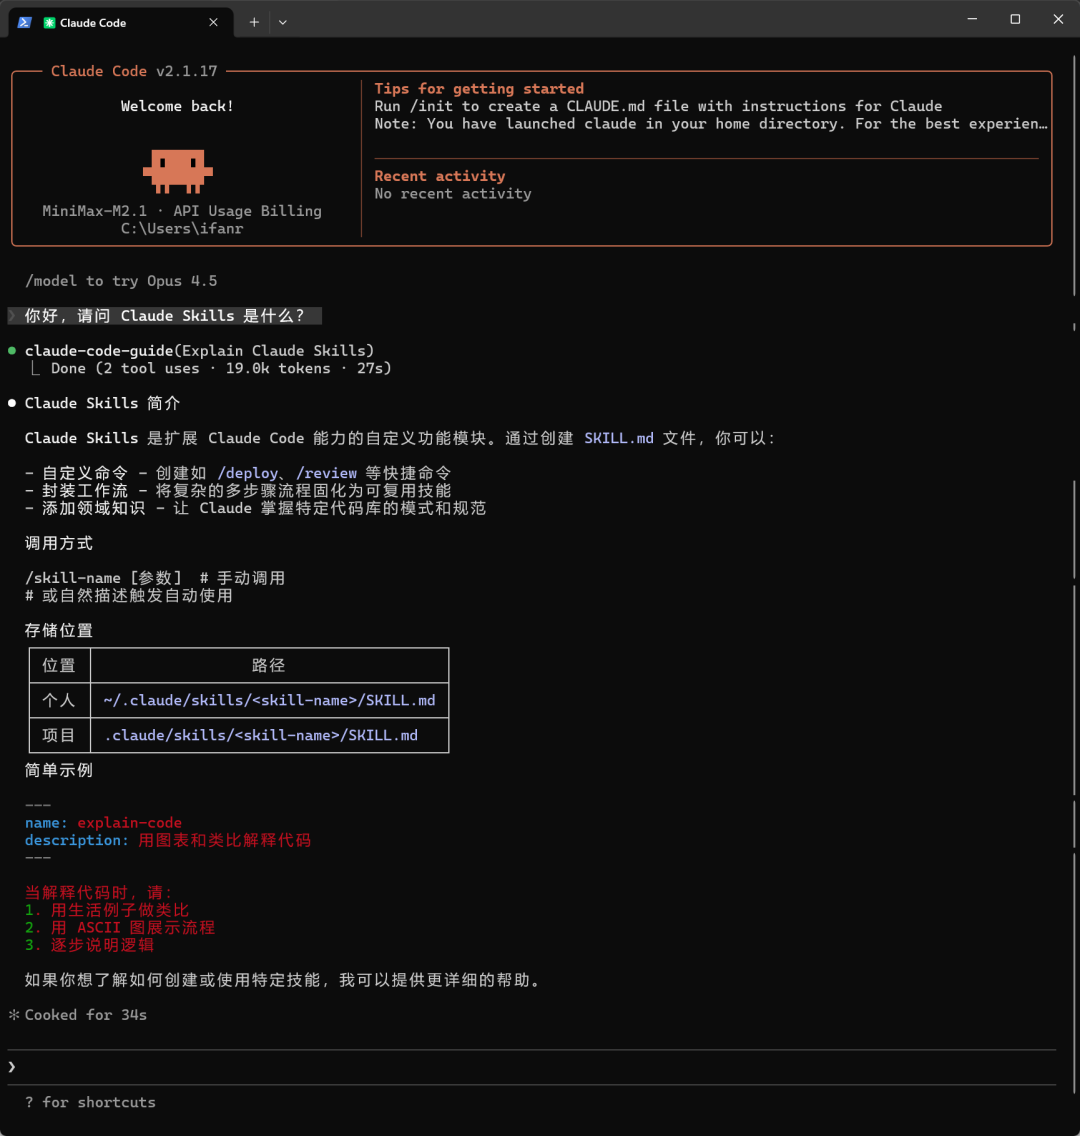
At this point, if your API is available, we can directly have a dialogue in Claude Code.
Generally speaking, we will enable Claude Code in a dedicated working folder.
This is more obvious on macOS. We must constantly grant Claude Code access to the folder. If it is in the default folder, the content generated and processed by Claude Code will be relatively messy.macOS can also open in the terminal with a right-click, or you can directly drag the folder onto the terminal application logo in the dock.
At this point, Claude Code is basically configured. Now we can let it actually do some work that other AIs can't.
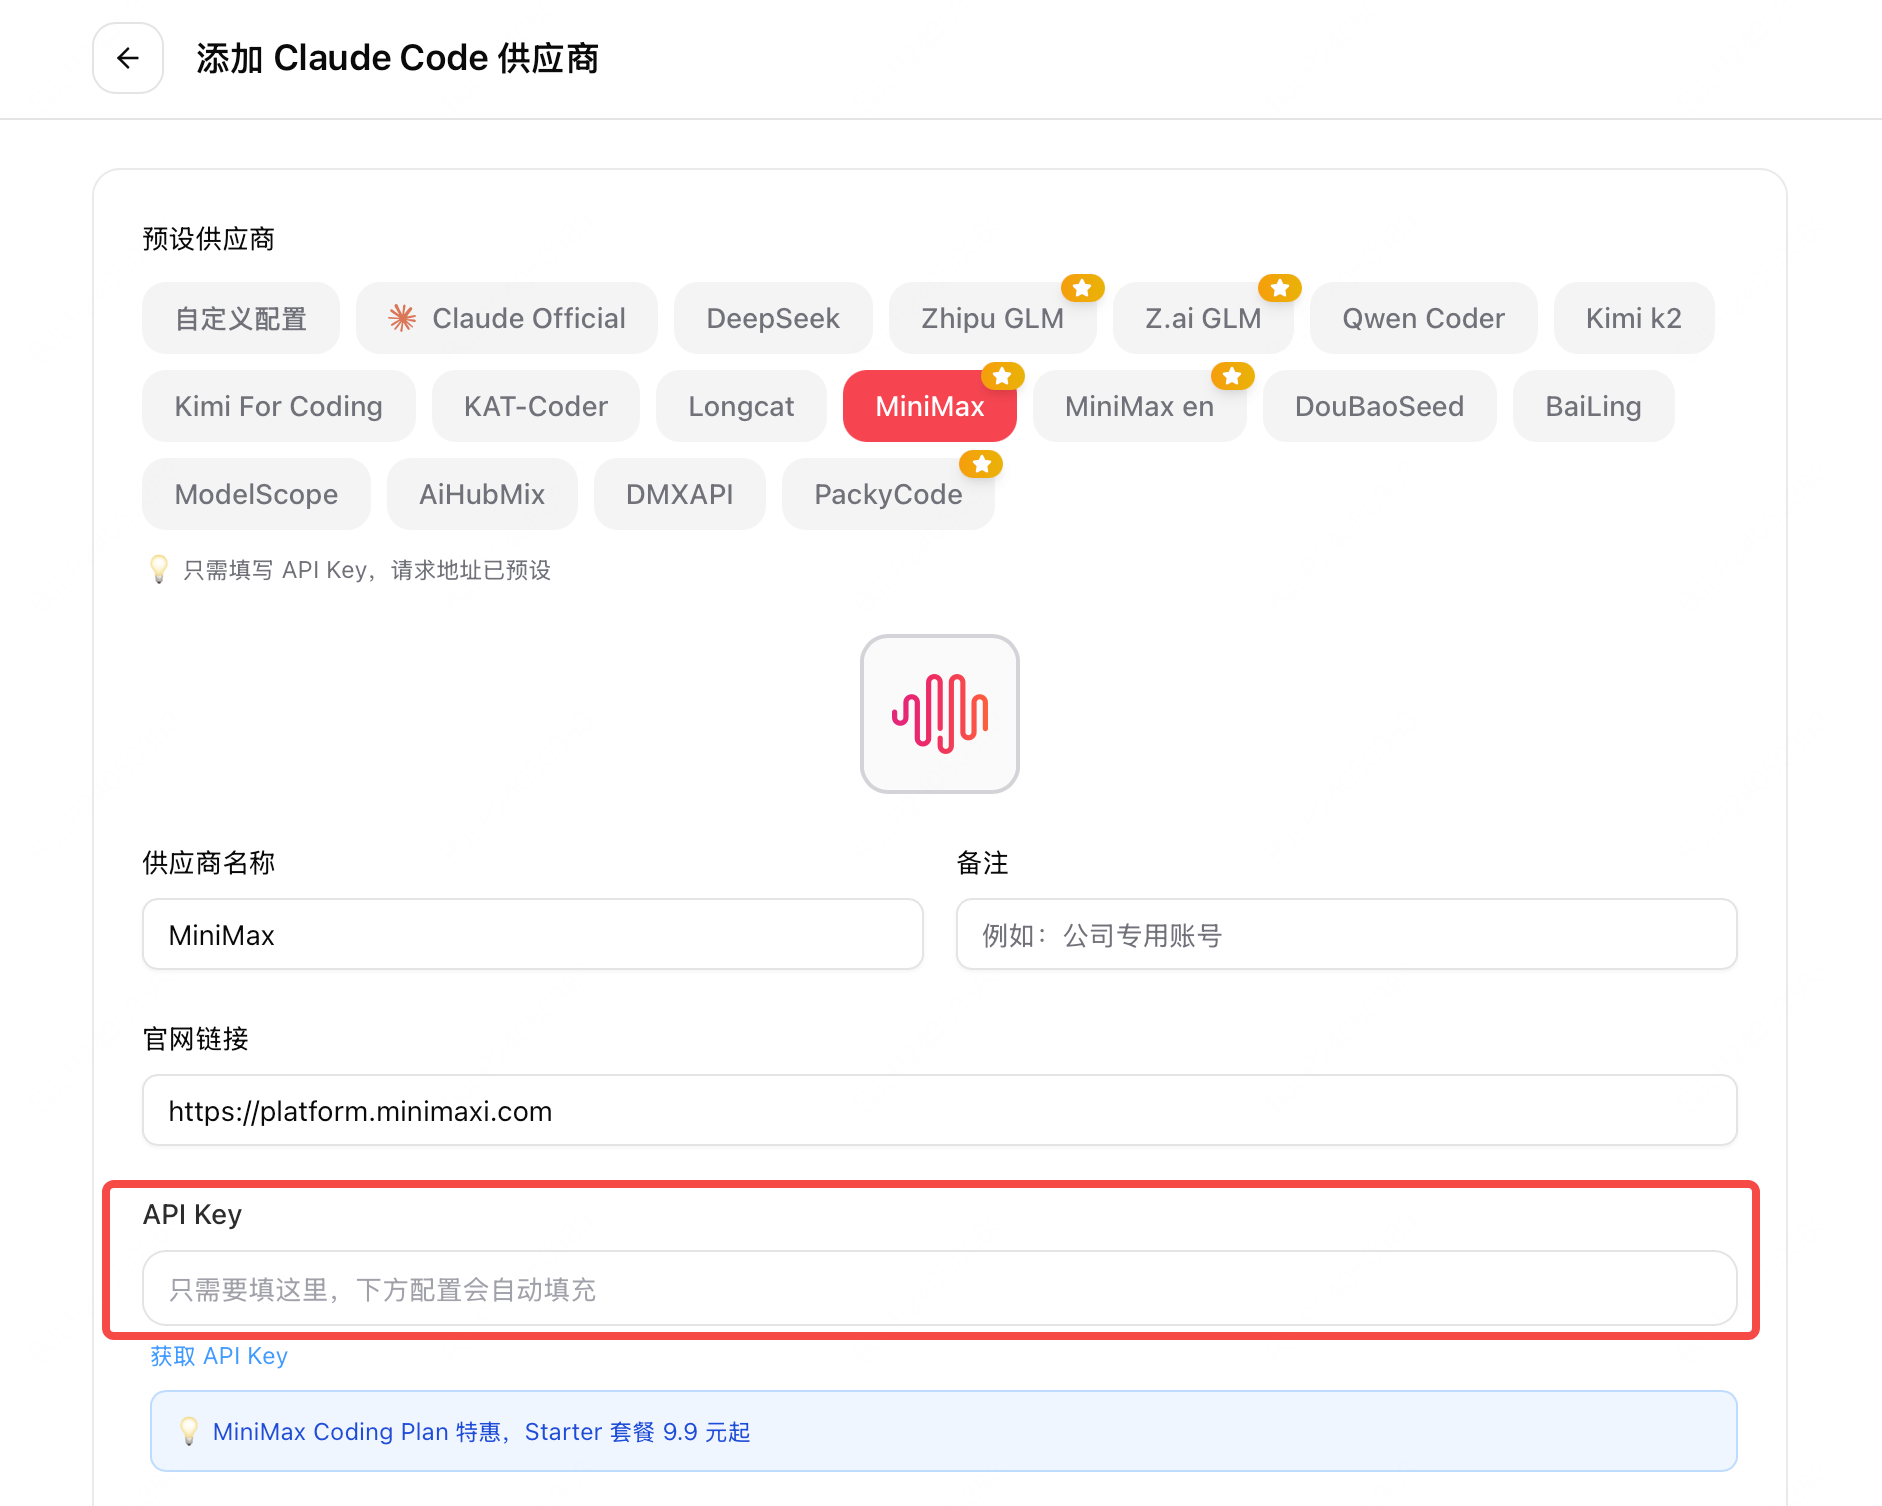
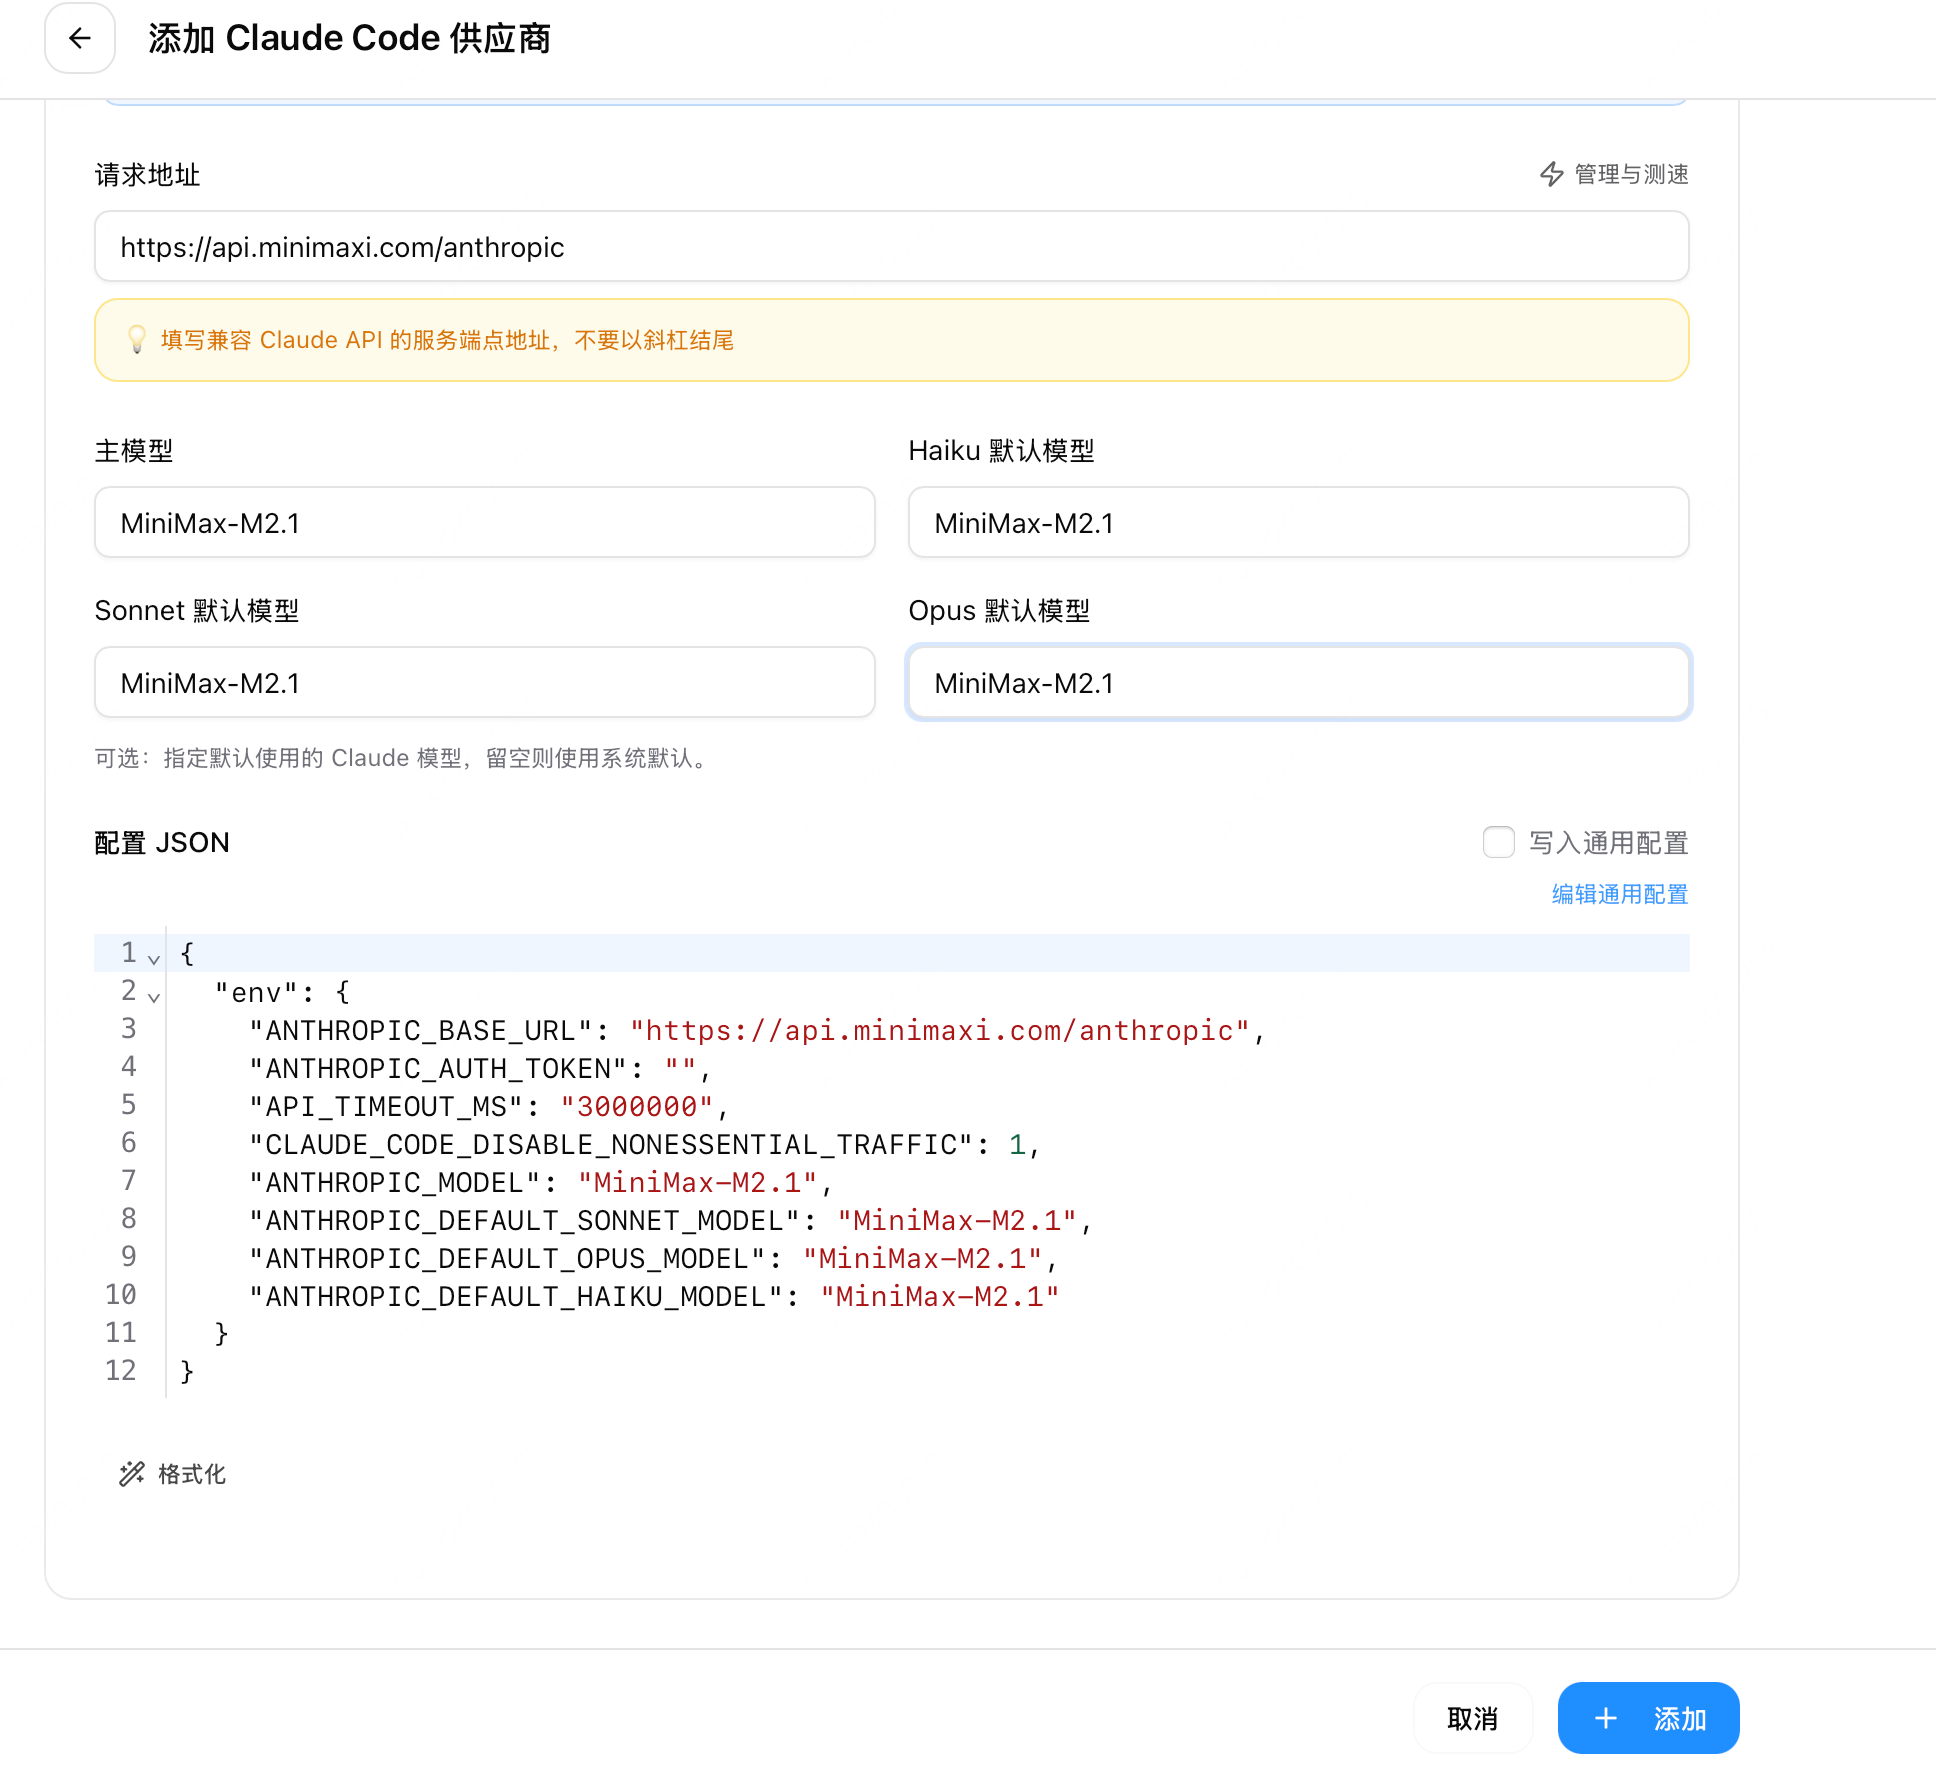
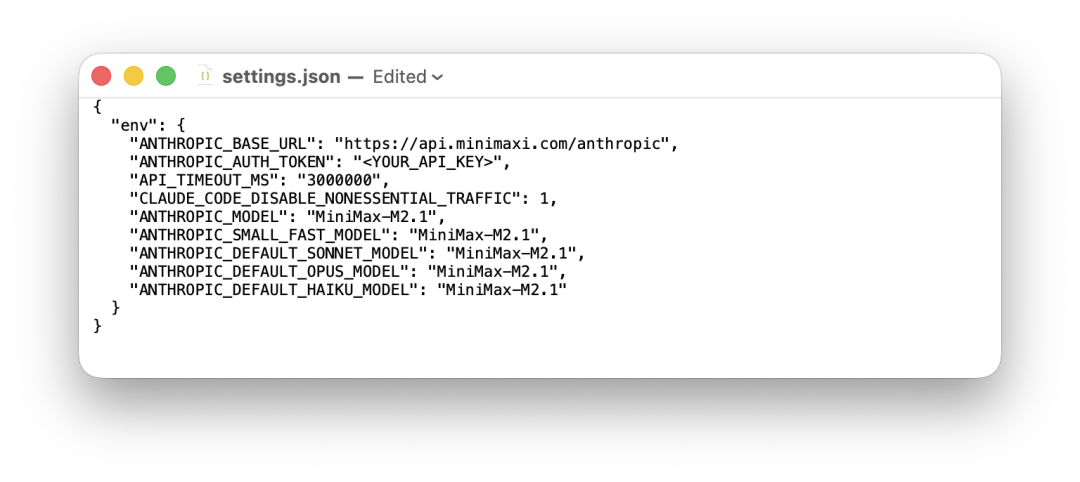
If you want to use other APIs, such as MiniMax 2.1, there are also specific instructions in their open platform documentation center at https://platform.minimaxi.com/docs/guides/text-ai-coding-tools. Similarly, after obtaining the API, **modify the settings.json file**.
**https://platform.minimaxi.com/docs/guides/text-ai-coding-tools**
{ "env": {
"ANTHROPIC_BASE_URL": "https://api.minimaxi.com/anthropic", "ANTHROPIC_AUTH_TOKEN": "",
"API_TIMEOUT_MS": "3000000",
"CLAUDE_CODE_DISABLE_NONESSENTIAL_TRAFFIC": 1,
"ANTHROPIC_MODEL": "MiniMax-M2.1",
"ANTHROPIC_SMALL_FAST_MODEL": "MiniMax-M2.1",
"ANTHROPIC_DEFAULT_SONNET_MODEL": "MiniMax-M2.1",
"ANTHROPIC_DEFAULT_OPUS_MODEL": "MiniMax-M2.1",
"ANTHROPIC_DEFAULT_HAIKU_MODEL": "MiniMax-M2.1"
} }
Replace the previous settings.json file with these files to switch to the MiniMax model.
**Let AI Actually Do Some Work**
First is chatting. We can now ask Claude Code to help us process files, download them, etc.
For example, we randomly found a video on YouTube, then copied the video link and directly gave it to Claude Code, asking it to download it.
In fact, you can see that Claude Code will keep reporting errors at the beginning, "command not found", and keep prompting that there is no corresponding command, but Claude Code will automatically process it and help us download and install these corresponding libraries.
**Among them, the video download library yt-dlp and the multimedia processing library ffmpeg, which we did not install before, Claude Code will install and then download and process the video files.**
However, here ffmpeg uses AV1 encoding, and some devices may not be able to decode it. At this time, we can directly ask Claude Code to re-encode the video to meet the playback adaptation of more devices.
The processing of other files is the same. For example, I have a PDF here, and I need it to help me paginate it, and save each page as a separate PDF file and a PNG image format file. Claude Code will automatically call the corresponding PDF library to help us process it.
In addition to these operations performed locally, **Claude Code can also modify our memory by editing CLAUDE.MD**. These functions are the same as the Cowork launched a few days ago, so you now have a free Cowork.
Next is the highlight, Skills are coming.
Installing SKill is particularly easy, and it can be solved with a single command. Take Claude's official Skills library as an example. Its introduction to each library starts with an installation command. We copy this command to the terminal,
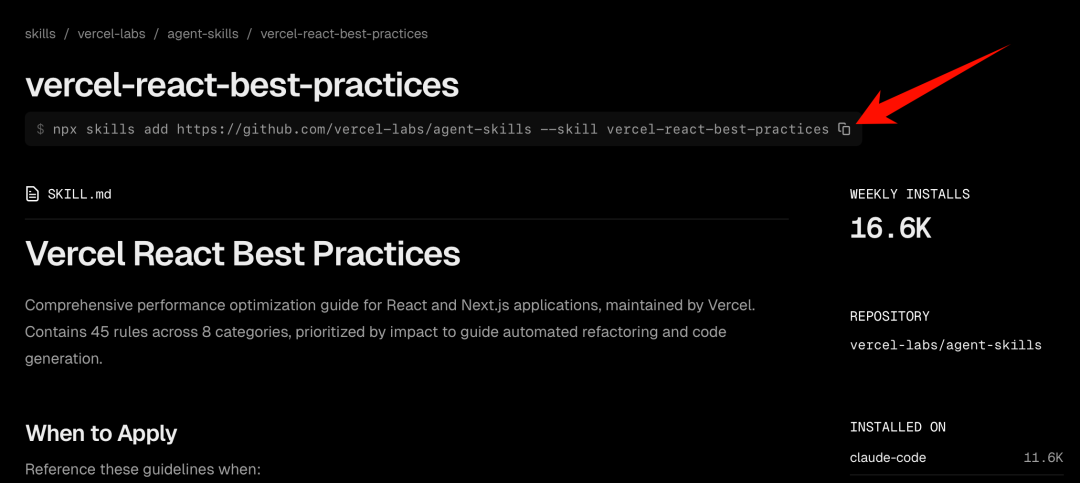**npx skills add https://github.com/remotion-dev/skills --skill remotion-best-practices**
**Windows may prompt that running any scripts is not allowed.** We can open the terminal in administrator mode and enter the command Set-ExecutionPolicy RemoteSigned -Scope CurrentUser, which means allowing running scripts written by ourselves, **or directly use CMD instead of PowerShell to run.**
**Set-ExecutionPolicy RemoteSigned -Scope CurrentUser**
Search for CMD, open it, enter y to confirm yes, and then you can choose which applications to install to, choose whether to install globally or only for a specific project. I usually choose to install globally if this Skills is not for a specific project. For other settings, such as the installation location, follow the recommendations and press Enter directly. Wait for the installation to complete.
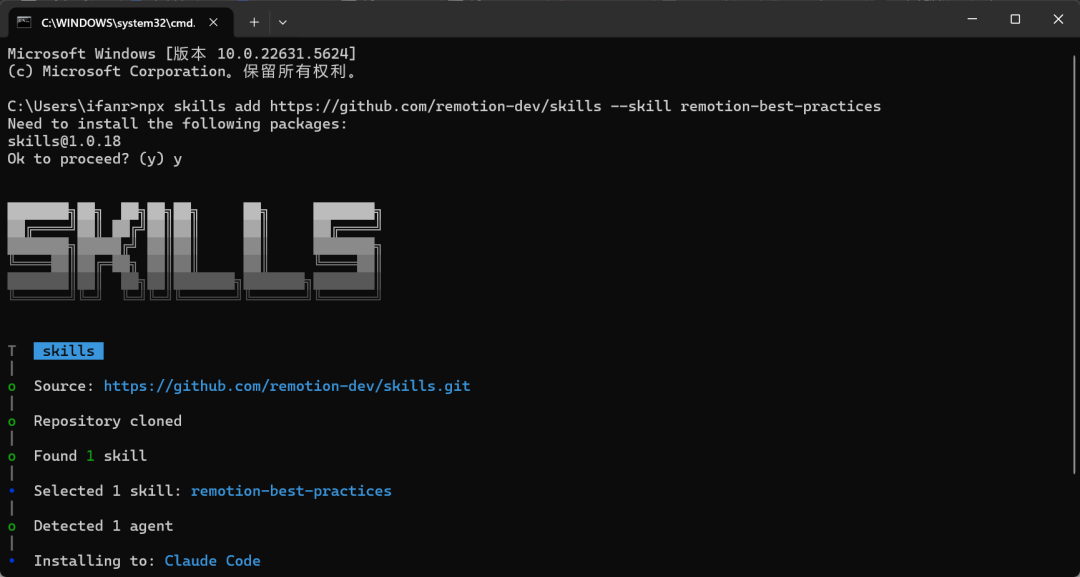
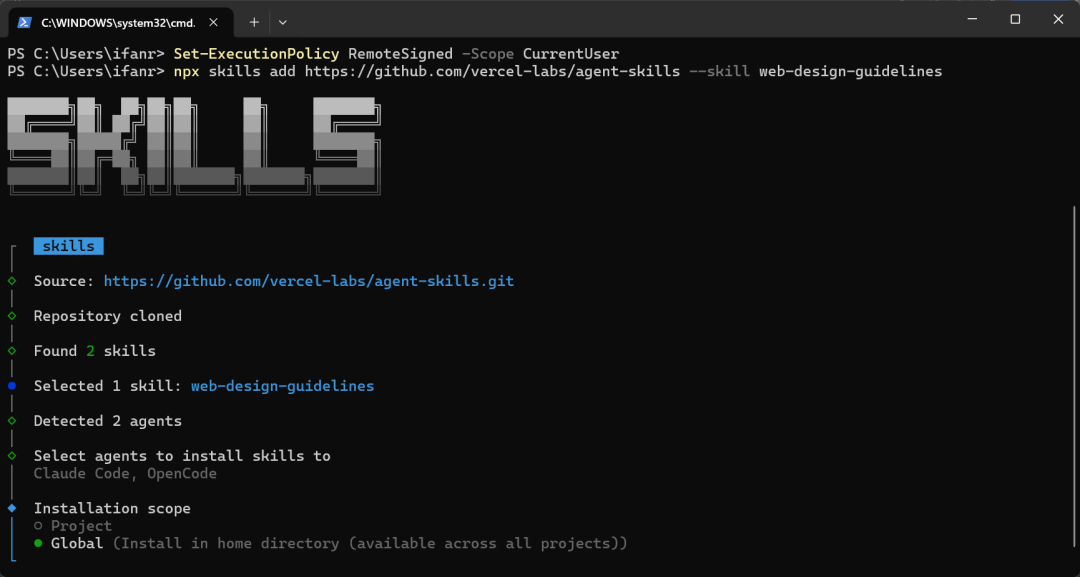
Use CMD and PowerShell terminals for installation
After the installation is complete, enter claude to enter Claude Code, and then slash /, we can see the two Skills that have been installed, one is remotion-best-practices, and the other is web-design-guidelines.
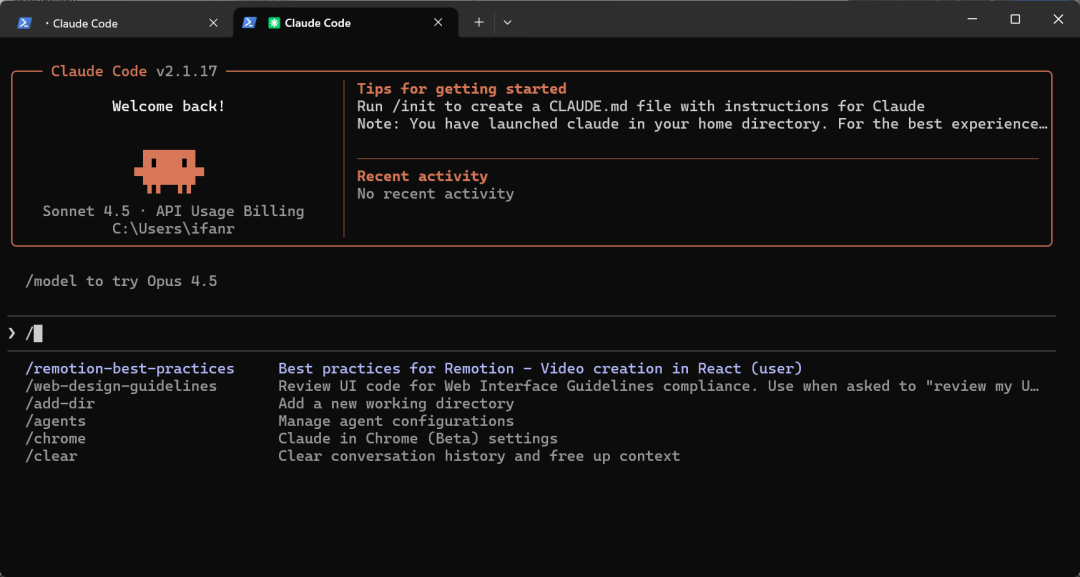
In addition to enabling the corresponding Skills through a slash /, in Claude Code, it can also automatically call the corresponding Skills to complete the tasks we issue.
Different from those libraries automatically installed by Claude Code, Skills is more like a workflow. For example, Claude's official also provides some Skills for PDF file processing. This Skill not only includes the PDF processing tools mentioned earlier, but also more specific workflows to deal with various PDF-related tasks.
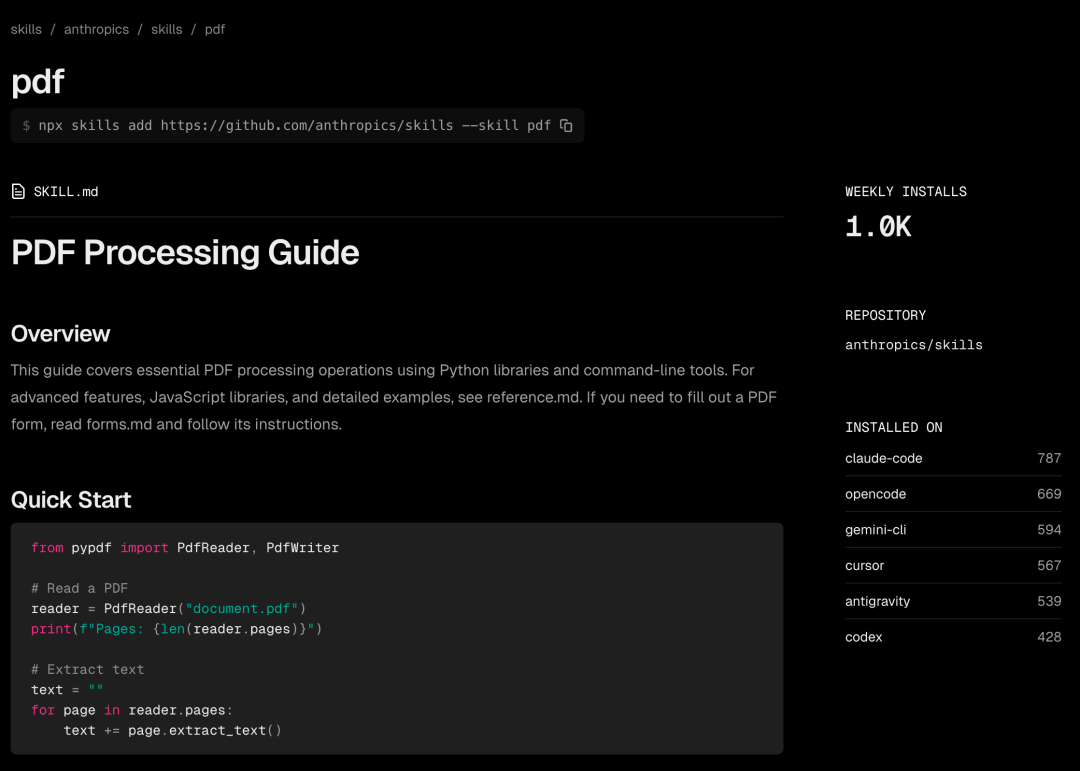
So, when do we need to use Skills, or just let Claude Code find the corresponding library by itself through prompts; how to use Skills well is a new lesson.
Any task that can be summarized into a set of workflows can be handled by Skills. Especially those tasks that AI has no way to automatically summarize the workflow with its own knowledge.
For tasks such as sentence translation, AI has already mastered the process of translating different languages. We don't need to give it any roles. With just a simple one or two prompts, most AIs can translate very well. **Using a Skills to do translation at this time is a bit redundant.**
However, translation can be packaged into a larger Skill, such as needing to be translated into a specific format, layout, and writing style; and translating PDFs that cannot be directly copied and contain various charts and papers...
These tasks that we need to tell AI how to handle every time can now be solved with Skills.
Recently, the Skill of making videos is very popular, and we directly let it make a Claude Code installation tutorial video.
I think this effect is a bit of touting Remotion's ability. It is obvious that a webpage is made first, and then the webpage is rendered into a video. However, this concept is quite fresh. If the prompts can be adjusted further, there may be some different finished products.
Making videos is no problem, and generating images is even easier. We can also let it generate a Canva design image. We don't need to enter a slash / to wake up Skills first. The prompts we enter can automatically trigger the use of related Skills. Claude Code will ask us if we want to use the canva-design skill.
There will also be a description in the skill.md document to tell the Agent when to invoke the Skill.
This 2.35:1 cover has an online design sense, but it's a bit too minimalist.
Directly processing computer files has advantages and obvious disadvantages. Sometimes, deleting useful files without warning is the most common complaint on social media about products like Claude Code.
After enabling Plan mode, a prompt will appear saying "plan mode on"
A small tip is that when using Claude Code, **you can press shift+tab to switch to Plan Mode.**
In Plan Mode, Claude Code will not only remain in "read-only mode", without performing any operations on computer files, but will only provide an execution plan first; in addition, it will have more thinking than normal mode.
Although Claude officially recommends that we use Plan Mode for multi-step implementation, code exploration, and interactive development projects, our experience is that there is no additional impact when it is turned on for general tasks.
Like this shortcoming, Claude Code is not a product for general users, even Skills are not.
When we install Skills, if you already have these programming tools installed on your computer, you will see that it can select different Agents, **including OpenCode, Cursor, ByteDance's Trae, Tencent's CodeBuddy, Gemini CLI, and other tools**.
These tools are designed for developers. The fact that they can now come out of the code circle may also confirm that in the AI era, the difference brought about by this type of tool will become smaller and smaller.
Everyone can pick up a handy tool, build wheels, assemble them into cars, and then drive this car to take us to places we have never been before.Future APPSO will bring more tool guides for the AI era. Our offline event, AIDONE, is also constantly being updated. Join us to discover and experience better and more useful products of tomorrow.Published in Technology